Air Fryer Bread: Easy Homemade Bread in the Air Fryer
There’s something irresistible about the smell of freshly baked bread—but what if you could enjoy that warm, golden loaf without turning on your full-size oven?
This easy air fryer bread recipe does exactly that.
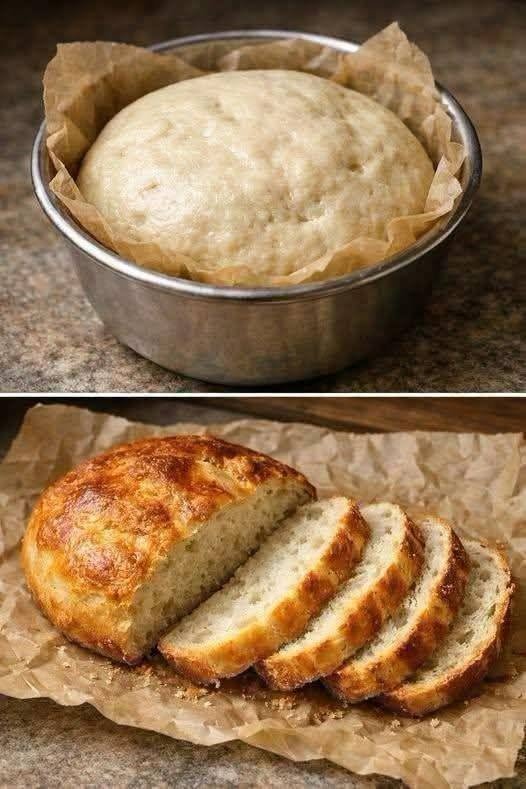
Imagine pulling a small loaf from the air fryer with a beautifully golden crust, then slicing into the warm center to reveal soft, tender bread. The crust has just enough chew, while the inside is fluffy and delicate. Spread a little butter over a warm slice and watch it melt into the crumb.
Best of all, this homemade bread uses simple pantry ingredients and can be ready in a fraction of the time you might expect.
Whether you live in a small kitchen, don’t want to heat up the house, or simply love experimenting with your air fryer, this recipe is a wonderfully easy way to make fresh bread at home.
Air Fryer Bread: Easy Homemade Bread With a Golden Crust
Introduction
The first time you make bread in an air fryer, it feels almost too easy.
There’s no large oven roaring away in the kitchen. No complicated equipment. No need to wait for an enormous loaf to bake.
Instead, you mix a handful of ingredients, let the dough rise, shape it into a small loaf, and place it directly into your air fryer.
Then the magic happens.
Warm yeast and butter aromas begin filling the kitchen. The top turns beautifully golden brown, and when you finally slice into the loaf, you’re rewarded with a soft, fluffy center surrounded by a lightly crisp crust.
This homemade air fryer bread is perfect for breakfast toast, sandwiches, soup, eggs, or simply eating warm with butter.
And honestly, that last option might be the best one.
Why You’ll Love This Air Fryer Bread Recipe
- Easy to make: No complicated bread-baking techniques required.
- Small-batch friendly: Perfect when you don’t need a giant loaf.
- Faster than conventional baking: The air fryer heats quickly.
- Golden crust: Excellent browning in a compact appliance.
- Soft and fluffy center: Yeast creates a tender, airy crumb.
- Budget-friendly: Uses basic ingredients.
- Versatile: Great for toast, sandwiches, breakfast, and dinner.
- Beginner-friendly: An excellent first homemade bread recipe.
- Perfect for small kitchens: No need to heat a large oven.
Ingredients With Exact Measurements
This recipe makes 1 small loaf, approximately 6–8 servings.
Bread Dough
- All-purpose flour: 2 cups / 250 g / 8.8 oz
- Warm water: ¾ cup / 180 ml / 6 fl oz
- Instant or active dry yeast: 2¼ teaspoons / 7 g / 0.25 oz
- Granulated sugar: 1 tablespoon / 12–13 g / 0.45 oz
- Salt: 1 teaspoon / 5–6 g / 0.2 oz
- Unsalted butter, melted: 1 tablespoon / 14 g / 0.5 oz
- Olive oil: 1 teaspoon / 5 ml / 0.17 fl oz
Optional Topping
- 1 teaspoon melted butter
- Sesame seeds
- Poppy seeds
- Everything seasoning
For a simple rustic loaf, melted butter brushed over the top is all you need.
Ingredient Substitutions
Whole-Wheat Flour
Replace up to ½ cup / 60 g / 2.1 oz of all-purpose flour with whole-wheat flour.
Using 100% whole-wheat flour will create a denser loaf and may require a little extra water.
Milk
For a softer, richer loaf, replace some or all of the water with warm milk.
Honey
Replace the sugar with 1 tablespoon / 21 g / 0.75 oz honey.
Dairy-Free
Replace butter with olive oil or a plant-based butter alternative.
Nutritional Information
Approximate nutrition per serving, assuming 8 slices:
- Calories: 145–160 kcal
- Protein: 4–5 g
- Carbohydrates: 27–29 g
- Fat: 2–3 g
- Fiber: approximately 1 g
The exact nutrition depends on your flour, butter, serving size, and substitutions.
Dietary Information
- Vegetarian: Yes
- Vegan: Not as written, but easily adapted with oil instead of butter
- Gluten-free: No, unless you use a suitable gluten-free bread flour blend
- Dairy-free: Can be made dairy-free
- Keto: No
- Low-carb: No
Kitchen Tools Needed
You’ll need:
- Air fryer
- Large mixing bowl
- Measuring cups and spoons
- Kitchen scale, optional but recommended
- Wooden spoon or spatula
- Clean kitchen towel
- Small bowl
- Parchment paper
- Cooling rack
- Serrated bread knife
A kitchen scale is particularly useful when making bread because measuring flour by weight gives more consistent results.
Step-by-Step Preparation
1. Activate the Yeast
If you’re using active dry yeast, pour the warm water into a mixing bowl.
The water should be around 100–110°F / 38–43°C.
Add the sugar and yeast.
Stir gently and let it sit for approximately 5–10 minutes.
The mixture should become slightly foamy.
If you’re using instant yeast, you can skip this activation step and mix it directly with the flour.
Pro Tip
Don’t use very hot water.
Water that’s too hot can damage the yeast and prevent the dough from rising properly.
2. Make the Dough
Add the flour and salt to the bowl.
Pour in the melted butter and olive oil.
Mix with a wooden spoon or spatula until a rough dough forms.
The dough should look soft and slightly sticky.
If it’s extremely wet, add flour 1 tablespoon at a time.
If it’s very dry or crumbly, add warm water 1 teaspoon at a time.
Don’t add large amounts of flour at once.
A slightly tacky dough generally produces softer bread.
3. Knead the Dough
Transfer the dough to a lightly floured work surface.
Knead for approximately 7–10 minutes by hand.
Push the dough away with the heel of your hand, fold it back, rotate, and repeat.
You’re looking for a dough that becomes:
- Smooth
- Elastic
- Soft
- Slightly tacky but not wet
You can also use a stand mixer fitted with a dough hook and knead for approximately 5–7 minutes on low to medium-low speed.
4. First Rise
Place the dough in a lightly oiled bowl.
Turn it once so the surface is lightly coated with oil.
Cover with a clean kitchen towel or plastic wrap.
Place it somewhere warm and allow it to rise for approximately 60–90 minutes.
The dough should roughly double in size.
If your kitchen is cool, it may take longer.
Don’t judge the dough solely by the clock. Its size and texture matter more than an exact rising time.
5. Shape the Loaf
Once the dough has doubled, gently press it down to release some of the excess gas.
Shape it into a compact round or oval loaf that fits comfortably inside your air fryer basket.
Don’t make the loaf too large.
Remember that it will expand during the second rise and again slightly during baking.
6. Second Rise
Place the shaped dough on a piece of parchment paper.
Cover loosely and allow it to rest for approximately 20–30 minutes.
It should become visibly puffier.
While the dough rests, preheat your air fryer.
7. Preheat the Air Fryer
Preheat the air fryer to:
320°F / 160°C for approximately 3–5 minutes.
Air fryers vary considerably, so your first loaf may require a little experimentation.
8. Prepare the Loaf
Brush the surface lightly with melted butter.
If desired, sprinkle sesame seeds, poppy seeds, or everything seasoning over the top.
For a rustic appearance, make one shallow slash across the top using a sharp knife.
Don’t cut too deeply.
9. Air Fry the Bread
Carefully place the parchment and dough into the air fryer basket.
Cook at 320°F / 160°C for approximately 20–25 minutes.
Start checking around the 18-minute mark because air fryers differ significantly.
The loaf should be:
- Golden brown on top
- Firm to the touch
- Well risen
- Cooked through in the center
If the top is browning too quickly while the center still needs time, loosely cover the top with aluminum foil.
Make sure the foil is securely positioned and cannot contact the heating element.
10. Check for Doneness
The most reliable method is an instant-read thermometer.
The center of the loaf should reach approximately 190–200°F / 88–93°C.
If you don’t have a thermometer, tap the bottom of the loaf.
It should sound relatively hollow rather than soft and dense.
If the loaf feels heavy or doughy in the middle, return it to the air fryer for another 3–5 minutes and check again.
11. Cool Before Slicing
This is the hardest step because your kitchen will smell incredible.
Transfer the bread to a cooling rack.
Let it cool for at least 30–45 minutes before slicing.
Cutting bread while it’s extremely hot can compress the crumb and make the center appear gummy.
Once cool enough to slice, grab a serrated knife and cut into thick pieces.
Then add butter.
Lots of butter.
Expert Tips for Perfect Air Fryer Bread
Don’t Pack in Too Much Flour
Too much flour produces dry, dense bread.
If the dough is slightly sticky during kneading, resist the urge to dump in handfuls of flour.
Use only enough to keep it manageable.
Watch the Top
Air fryers circulate intense heat very close to the food.
This means the crust can brown faster than the center cooks.
If necessary, protect the top with foil during the final stage.
Know Your Air Fryer
A 5-quart air fryer and a large countertop air fryer can behave very differently.
The first time you make this bread, start checking early.
Give the Dough Enough Time to Rise
If the dough hasn’t doubled, don’t rush it into the air fryer.
Yeast needs time to produce the air bubbles that create fluffy bread.
Don’t Skip Cooling
Cooling isn’t just about temperature.
It’s part of the bread-making process.
The interior continues to set as the loaf cools.
Common Mistakes & How to Fix Them
My Bread Is Dense
The yeast may have been inactive, the dough may not have risen enough, or too much flour may have been added.
Check your yeast and allow the dough to fully double before baking.
The Outside Is Burnt
Your air fryer may be running hotter than expected.
Reduce the temperature by 10–20°F / 5–10°C and cover the top loosely with foil if necessary.
The Inside Is Raw
The loaf may be too large or the temperature too high.
Reduce the temperature and extend the cooking time.
Always check the center rather than relying solely on the crust color.
My Dough Isn’t Rising
Your yeast may be expired, or the environment may be too cold.
Place the covered dough somewhere warm and draft-free.
My Bread Is Dry
Too much flour or overbaking is usually responsible.
Measure flour carefully and begin checking the loaf before the maximum cooking time.
Variations & Customizations
Garlic Butter Air Fryer Bread
Mix:
- 1 tablespoon melted butter
- ½ teaspoon garlic powder
- ½ teaspoon dried parsley
Brush over the loaf immediately after baking.
The aroma is incredible.
Cheesy Air Fryer Bread
Add ½ cup / 55 g / 2 oz shredded cheddar or mozzarella to the dough.
You can also sprinkle extra cheese over the top during the final few minutes.
Cinnamon Honey Bread
Replace the olive oil with butter and add:
- 1 tablespoon honey
- 1 teaspoon cinnamon
This makes a lightly sweet loaf that’s fantastic toasted.
Herb Bread
Add:
- 1 teaspoon dried Italian herbs
- ½ teaspoon garlic powder
- ¼ teaspoon black pepper
Serve alongside soup or pasta.
Whole-Wheat Air Fryer Bread
Replace ½ cup of the flour with whole-wheat flour.
Add another tablespoon or two of water if the dough feels dry.
Storage & Reheating
Room Temperature
Once completely cool, store the bread in an airtight container or bread bag.
It is best eaten within 2–3 days.
Avoid refrigerating homemade bread unless necessary, because refrigeration can make bread stale faster.
Freezer
Slice the loaf before freezing.
Place parchment paper between slices and store in a freezer-safe bag.
Freeze for up to 2–3 months for best quality.
Reheating
For the best texture, place a slice in the air fryer at:
300°F / 150°C for 2–4 minutes.
You can also toast it directly from frozen.
For a softer slice, microwave for approximately 10–15 seconds, then butter immediately.
Serving Suggestions
This bread is incredibly versatile.
Breakfast
Serve toasted with:
- Butter
- Fried eggs
- Scrambled eggs
- Bacon
- Sausage
- Cheese
Lunch
Turn it into a sandwich with:
- Turkey and cheese
- Chicken salad
- Tuna
- Roast beef
- Egg salad
Dinner
Serve warm alongside:
- Tomato soup
- Chicken soup
- Beef stew
- Creamy pasta
- Roasted chicken
Simple Snack
Toast a thick slice and spread with butter and honey.
Sometimes you really don’t need anything more.
Frequently Asked Questions
1. Can I make bread in any air fryer?
Most air fryers can bake small loaves, provided the basket or cooking chamber is large enough to accommodate the dough with room for expansion.
Always check your manufacturer’s instructions for suitable cookware and baking use.
2. Do I need to preheat the air fryer?
Preheating helps create more consistent baking conditions and is recommended for this recipe.
3. Why is my air fryer bread brown on top but raw inside?
The heat is reaching the outside faster than the center.
Lower the temperature and extend the cooking time. Cover the top loosely with foil if necessary.
4. Can I use self-rising flour?
You can experiment with it, but this recipe was developed around all-purpose flour and yeast. Self-rising flour already contains chemical leavening, so the texture will be different.
5. Can I make this bread without yeast?
Yes, but it becomes a different style of bread.
A yeast-free air fryer bread can be made with baking powder, but it will generally be denser and more biscuit-like rather than fluffy and chewy.
6. Can I make the dough ahead of time?
Yes. After kneading, cover the dough and refrigerate it overnight. Let it warm and complete its rise before shaping and air frying.
7. How do I know when air fryer bread is done?
The most reliable method is checking the internal temperature. Aim for approximately 190–200°F / 88–93°C in the center.
Final Thoughts
There’s something deeply satisfying about making your own bread.
And when that bread comes out of an air fryer—golden, warm, fragrant, and fluffy—it feels almost like a little kitchen trick.
You don’t need a professional oven or complicated baking equipment. With flour, yeast, water, salt, and a few simple ingredients, you can create a loaf that’s delicious enough to make an ordinary breakfast or dinner feel special.
Serve it warm with butter.
Toast it for breakfast.
Turn it into a sandwich.
Or tear off a piece straight from the loaf while it’s cooling—because let’s be honest, that’s probably going to happen anyway.
Give this easy air fryer bread recipe a try, then tell me how your loaf turned out and what you served it with. If you loved it, share the recipe with another homemade-bread fan!