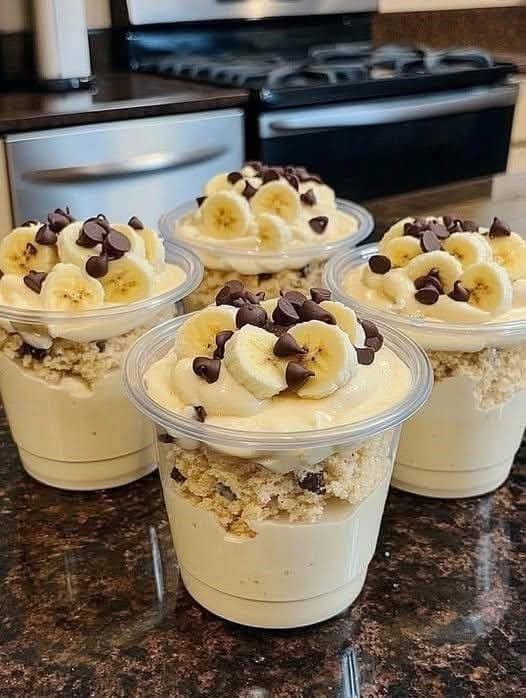
Banana Pudding Cups: Easy, Creamy, No-Bake Dessert in Individual Servings
There are desserts that require a special occasion—and then there are desserts like Banana Pudding Cups, which can turn an ordinary afternoon into something worth celebrating.
Imagine lifting the lid on a chilled dessert cup and seeing golden banana slices tucked between velvety vanilla pudding, fluffy whipped cream, and buttery cookie crumbs. The first spoonful gives you a little bit of everything: creamy pudding, soft ripe banana, delicate crunch, and that nostalgic vanilla-cookie flavor that somehow tastes like childhood in the very best way.
And the best part? You don’t need to turn on the oven.
These easy Banana Pudding Cups are layered in individual glasses or dessert cups, making them perfect for family dinners, birthday parties, potlucks, baby showers, picnics, or those evenings when you simply want something sweet without spending hours in the kitchen.
Once you make them, don’t be surprised if everyone starts asking, “Are there any more?”
Why You’ll Love This Banana Pudding Cups Recipe
- No-bake and beginner-friendly: No complicated baking techniques or special equipment required.
- Ready quickly: You can assemble these individual desserts in about 20 minutes.
- Perfectly portioned: Everyone gets their own adorable little cup.
- Budget-friendly: Simple pantry and refrigerator staples create an impressive dessert.
- Kid-friendly: Creamy pudding, bananas, cookies, and whipped cream are an easy crowd-pleaser.
- Great for entertaining: The individual presentation looks elegant with almost no extra effort.
- Make-ahead friendly: Prepare the cups several hours before serving.
- Customizable: Easily make them lighter, gluten-free, dairy-free, or extra indulgent.
- Beautifully layered: The contrasting golden bananas, pale pudding, whipped cream, and cookie crumbs make every cup irresistible.
Ingredients for Banana Pudding Cups
This recipe makes 6 individual dessert cups, approximately 8 ounces (240 ml) each.
For the pudding
- 3 cups (720 ml / 24 fl oz) whole milk
- 1/2 cup (100 g / 3.5 oz) granulated sugar
- 1/4 cup (32 g / 1.1 oz) cornstarch
- 1/4 teaspoon salt
- 3 large egg yolks
- 2 tablespoons (28 g / 1 oz) unsalted butter
- 2 teaspoons (10 ml / 0.34 fl oz) pure vanilla extract
For the layers
- 3 medium ripe bananas, approximately 330 g (11.6 oz) peeled
- 24 vanilla wafer-style cookies, approximately 100 g (3.5 oz)
- 1 1/2 cups (360 ml / 12 fl oz) heavy whipping cream
- 2 tablespoons (16 g / 0.6 oz) powdered sugar
- 1/2 teaspoon vanilla extract
Optional toppings
- Extra banana slices
- Crushed vanilla cookies
- A drizzle of caramel sauce
- A pinch of cinnamon
- White chocolate shavings
Healthy Substitutions
Want a slightly lighter banana pudding cup? Use 2% milk instead of whole milk and reduce the whipped cream topping.
For a dairy-free version, use unsweetened oat or almond milk and dairy-free butter, then replace the heavy cream with a plant-based whipping cream.
For a gluten-free dessert, choose certified gluten-free vanilla cookies.
For naturally sweeter pudding, you can reduce the granulated sugar slightly and rely more heavily on ripe bananas for sweetness.
Nutritional Information Per Serving
Approximate values for one 8-ounce dessert cup:
- Calories: 430
- Protein: 7 g
- Carbohydrates: 57 g
- Fat: 20 g
- Fiber: 2 g
- Calcium: Approximately 150 mg
- Potassium: Approximately 300 mg
- Vitamin B6: Provided by the banana
- Vitamin C: Small amount from banana
Nutritional values will vary depending on the cookies, milk, whipped cream, and toppings used.
Dietary notes: The basic recipe is vegetarian but is not vegan, keto, or gluten-free. It can be adapted for vegan and gluten-free diets with the substitutions above. Because bananas and cookies contribute carbohydrates, traditional Banana Pudding Cups are not suitable for a strict keto diet.
Kitchen Tools You’ll Need
You don’t need a kitchen full of gadgets for this recipe.
- Medium saucepan
- Whisk
- Mixing bowls
- Fine-mesh strainer, optional
- Electric hand mixer or stand mixer
- Rubber spatula
- 6 individual dessert cups, glasses, or small jars
- Measuring cups and spoons
- Knife and cutting board
- Plastic wrap
How to Make Banana Pudding Cups
Step 1: Prepare the pudding mixture
In a medium saucepan, whisk together the sugar, cornstarch, and salt.
Gradually whisk in the milk, making sure the cornstarch dissolves completely. Add the egg yolks and continue whisking until smooth.
Place the saucepan over medium heat.
Cook for approximately 6–8 minutes, whisking constantly. The mixture will gradually transform from thin and milky into a thick, silky custard.
Don’t walk away during this step. Pudding can thicken surprisingly quickly once it reaches the right temperature.
Texture cue: When you lift the whisk, the pudding should fall back in thick ribbons rather than looking watery.
Step 2: Finish the vanilla pudding
Once thickened, remove the saucepan from the heat.
Immediately whisk in the butter and vanilla extract until the butter melts completely and the pudding becomes glossy.
For an ultra-smooth pudding, pour it through a fine-mesh strainer into a clean bowl. This removes any tiny bits of cooked egg and gives you that luxurious, bakery-style texture.
Cover the surface directly with plastic wrap to prevent a skin from forming.
Allow the pudding to cool for approximately 20–30 minutes, then refrigerate until chilled.
Pro tip: Don’t add hot pudding directly to your banana layers. Excess heat can soften the cookies and make the bananas mushy.
Step 3: Whip the cream
Pour the cold heavy whipping cream into a chilled mixing bowl.
Add the powdered sugar and 1/2 teaspoon vanilla extract.
Beat with an electric mixer on medium-high speed for approximately 2–3 minutes, until soft-to-medium peaks form.
Stop mixing as soon as the cream holds its shape. Over-whipping can turn your beautifully fluffy cream grainy.
Step 4: Slice the bananas
Peel the bananas and cut them into approximately 1/4-inch (6 mm) slices.
Choose bananas that are ripe and sweet but still firm.
You want plenty of banana flavor without slices that collapse as soon as they hit the pudding.
Pro tip: Slice the bananas shortly before assembling the cups for the freshest appearance.
Step 5: Crush the cookies
Place the vanilla cookies in a zip-top bag and gently crush them with a rolling pin or the bottom of a glass.
Don’t turn every cookie into powder.
A mixture of fine crumbs and small crunchy pieces gives the dessert a much more enjoyable texture.
Reserve a few whole cookies for decorating if desired.
Step 6: Start layering
Now comes the fun part.
Add a spoonful of cookie crumbs to the bottom of each dessert cup.
Follow with a layer of vanilla pudding.
Add several banana slices, arranging a few against the side of the glass if you want those beautiful layers to show.
Add another layer of pudding, followed by more cookie crumbs and banana slices.
Continue until the cups are nearly full.
Think of every spoonful as a tiny combination of crunchy, creamy, fruity, and fluffy.
Step 7: Add the whipped cream
Spoon or pipe whipped cream over the top of each cup.
For a prettier presentation, transfer the whipped cream into a piping bag fitted with a star tip and pipe a small swirl onto each dessert.
Finish with crushed cookies, a banana slice, or a light drizzle of caramel.
Step 8: Chill before serving
Cover the cups loosely and refrigerate for at least 1 hour before serving.
For the best texture, serve them within 4–6 hours of assembly.
The chilling time allows the flavors to mingle while the cookies soften slightly around the edges without completely losing their texture.
Expert Cooking Tips & Mistakes to Avoid
Don’t use bananas that are too ripe
Very soft bananas can become mushy and brown quickly.
Look for bananas with plenty of yellow color and just a few brown spots.
Don’t rush the pudding
If you remove the pudding from the stove too early, it may remain too thin.
Keep whisking until it visibly thickens.
Don’t stop stirring
Constant whisking prevents scorching and reduces the chance of lumps.
If the bottom of the pan begins to catch, immediately transfer the pudding to another saucepan rather than scraping up the browned bits.
Cool the pudding before assembling
Warm pudding will soften the cookies too quickly and can cause the whipped cream to melt.
Don’t over-whip the cream
Stop when you see soft-to-medium peaks. If the cream becomes stiff, lumpy, or buttery-looking, you’ve gone too far.
Avoid assembling too far ahead
Banana Pudding Cups are best when the cookies have softened slightly but still provide some texture.
For that reason, making them several days ahead isn’t recommended.
Layer strategically
If presentation matters, place banana slices around the outside edge of the cup. The golden banana layers will show through the glass and make the dessert look restaurant-worthy.
Variations & Customizations
Spicy Cinnamon Banana Pudding Cups
For a warm, aromatic twist, add 1/2 teaspoon ground cinnamon to the pudding.
You can also sprinkle a tiny pinch of cinnamon between the layers.
For an even bolder flavor, add a small pinch of ground nutmeg.
The result is cozy, fragrant, and reminiscent of banana bread—but in creamy pudding form.
Healthy Banana Pudding Cups
For a lighter version:
- Use 2% milk.
- Reduce the sugar slightly.
- Use Greek yogurt whipped with a little honey instead of some of the whipped cream.
- Add extra banana and fewer cookies.
- Choose whole-grain or lower-sugar cookies when available.
You’ll still get that creamy banana dessert experience with a lighter finish.
Kids-Friendly Banana Pudding Cups
Let children build their own cups.
Set out bowls of pudding, sliced bananas, cookie crumbs, and whipped cream and let everyone create their own layers.
You can also make smaller portions in clear plastic cups for birthday parties or school-friendly celebrations.
For extra fun, add colorful sprinkles or mini chocolate chips.
Chocolate Banana Pudding Cups
Chocolate and banana are a match made in dessert heaven.
Add a layer of chocolate cookie crumbs or sprinkle mini chocolate chips between the layers.
You can even swirl a little chocolate sauce into the pudding before serving.
Peanut Butter Banana Pudding Cups
Add a thin drizzle of creamy peanut butter between the layers.
If the peanut butter is too thick to drizzle, gently warm it until fluid, then allow it to cool slightly before layering.
The combination of salty peanut butter, sweet banana, vanilla pudding, and cookies is seriously addictive.
Storage & Reheating Instructions
Refrigerator
Cover the Banana Pudding Cups and store them in the refrigerator.
For the best flavor and texture, enjoy them within 1–2 days.
The bananas may darken slightly over time, and the cookies will become progressively softer.
Freezer
Freezing is not recommended for fully assembled Banana Pudding Cups.
The pudding can become watery after thawing, while the bananas may develop an unpleasant texture and the whipped cream can lose its structure.
If you need to prepare ahead, make the pudding in advance and assemble the cups closer to serving time.
Reheating
These dessert cups are meant to be served cold, so reheating isn’t necessary.
If you’ve prepared the pudding separately and it has become very firm in the refrigerator, let it sit at room temperature for a few minutes and whisk gently before assembling.
Never microwave the completed dessert cups.
Serving Suggestions
Banana Pudding Cups are delicious all by themselves, but a few simple additions can turn them into an unforgettable dessert spread.
Serve them after:
- Grilled chicken or barbecue
- Burgers and sandwiches
- A casual family dinner
- A summer picnic
- A holiday buffet
- Birthday celebrations
- Baby or bridal showers
- Potluck dinners
For a coffeehouse-style dessert, serve each cup alongside a small cup of hot coffee or tea.
Want maximum indulgence? Add a drizzle of caramel sauce and a sprinkle of crushed cookies immediately before serving.
The contrast between the cold, creamy pudding and crunchy topping is absolutely irresistible.
Frequently Asked Questions
Can I make Banana Pudding Cups ahead of time?
Yes. You can prepare the pudding several days ahead and refrigerate it. For the freshest texture, assemble the individual cups about 1–6 hours before serving.
How do I keep the bananas from turning brown?
Use bananas that are ripe but firm and slice them shortly before assembly. Keeping the finished dessert refrigerated also helps preserve their appearance.
Can I use instant pudding instead?
Absolutely. If you’re short on time, instant vanilla pudding can replace homemade pudding. However, homemade vanilla pudding gives these cups a richer, more custard-like flavor.
Can I make this recipe without eggs?
Yes. You can make an egg-free pudding using milk, cornstarch, sugar, vanilla, and butter. Increase the cornstarch slightly if necessary to achieve the desired thickness.
Can I make Banana Pudding Cups vegan?
Yes. Use plant-based milk, vegan butter, dairy-free whipped topping, and vegan cookies. Make sure every packaged ingredient is certified or labeled vegan if that’s important for your dietary needs.
Why did my pudding become lumpy?
Lumps usually happen because the cornstarch wasn’t fully incorporated or the pudding wasn’t whisked consistently while heating.
If you get a few lumps, strain the hot pudding through a fine-mesh sieve before chilling it.
Why did my cookies become too soft?
The cookies naturally soften as they sit next to the pudding and bananas. If you prefer more crunch, reserve some cookie crumbs and sprinkle them over the cups immediately before serving.
Final Thoughts: A Little Cup of Comfort
There’s something wonderfully nostalgic about banana pudding.
Maybe it’s the sweet smell of vanilla. Maybe it’s the soft banana slices tucked beneath creamy pudding. Or perhaps it’s the way a simple cookie crumb suddenly transforms into something magical after spending time beside that silky custard.
Whatever the reason, these easy Banana Pudding Cups have a way of making people smile.
They’re simple enough for a Tuesday night, pretty enough for a celebration, and comforting enough to become a recipe you’ll return to again and again.
So grab your bananas, chill your cream, crush those cookies, and start layering.
Make these Banana Pudding Cups this week, then come back and tell me how they turned out. If your family loved them, share the recipe with a fellow dessert lover—you might just become their new favorite person.