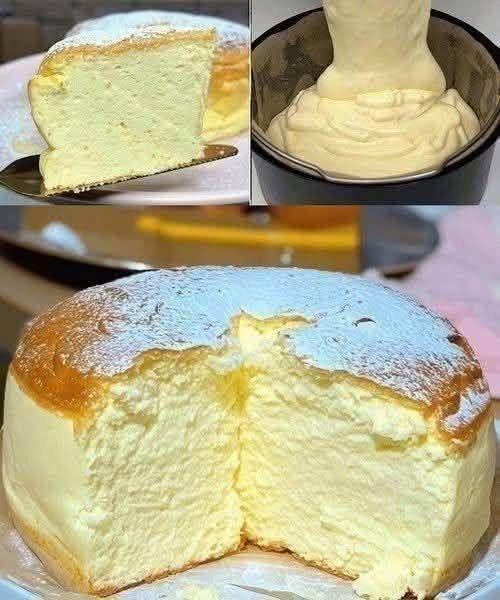
Cloud Cake Recipe: The Dreamy, Melt-in-Your-Mouth Dessert You’ll Want to Bake Again and Again
Introduction (Emotional Hook)
Have you ever tasted a dessert so light it almost seemed to disappear the moment it touched your tongue? That’s the magic of Cloud Cake—a soft, airy masterpiece that lives up to its heavenly name. With its delicate crumb, pillowy texture, and subtle vanilla aroma, this cake feels like biting into a sweet little cloud.
I still remember the first time I baked Cloud Cake on a rainy afternoon. The house slowly filled with the comforting scent of warm vanilla, melted butter, and freshly baked sponge. As the cake rose beautifully in the oven, it felt almost magical. The hardest part wasn’t baking it—it was waiting for it to cool before sneaking the first slice. One bite, and I was hooked. It was unbelievably soft, moist, and fluffy, with a gentle sweetness that paired perfectly with fresh berries and a dusting of icing sugar.
Whether you’re celebrating a birthday, hosting afternoon tea, preparing a holiday dessert, or simply craving something elegant yet effortless, Cloud Cake is one of those recipes that never fails to impress. It’s beautiful enough for special occasions but simple enough to bake on an ordinary weekend.
If you’re searching for the best Cloud Cake recipe, you’ve found it. This foolproof guide will show you exactly how to achieve a bakery-worthy cake with a tender crumb, airy texture, and irresistible flavour every single time.
Why You’ll Love This Cloud Cake Recipe
There are countless reasons to fall in love with this dreamy dessert:
- ✔ Wonderfully soft and fluffy texture
- ✔ Easy enough for beginner bakers
- ✔ Made with simple pantry ingredients
- ✔ Perfect for birthdays, holidays, and afternoon tea
- ✔ Light enough to enjoy year-round
- ✔ Easily customised with different flavours
- ✔ Beautiful presentation with minimal decorating
- ✔ Kid-friendly and family-approved
- ✔ Budget-friendly compared to bakery cakes
- ✔ Delicious with fruit, whipped cream, or chocolate
Ingredients (With Exact Measurements)
For the Cake
- 200 g (1⅔ cups / 7 oz) cake flour
- 200 g (1 cup / 7 oz) caster sugar, divided
- 6 large eggs, separated
- 80 ml (⅓ cup / 2.7 fl oz) whole milk
- 60 g (¼ cup / 2 oz) unsalted butter, melted
- 1 tbsp (15 ml) vanilla extract
- 1½ tsp baking powder
- ¼ tsp salt
- ½ tsp cream of tartar
Optional Toppings
- 250 ml (1 cup / 8 fl oz) whipped cream
- Fresh strawberries
- Blueberries
- Raspberries
- Icing sugar for dusting
- Lemon zest
- Edible flowers
Healthy Ingredient Swaps
- Replace whole milk with almond or oat milk.
- Use coconut sugar instead of caster sugar for a deeper flavour.
- Swap butter for light olive oil.
- Substitute part of the sugar with a natural sweetener suitable for baking.
- Use lactose-free milk and butter if needed.
Nutritional Information (Per Serving)
Approximate values (based on 10 servings, without optional toppings).
| Nutrient | Amount |
|---|---|
| Calories | 245 kcal |
| Protein | 6 g |
| Carbohydrates | 33 g |
| Fat | 9 g |
| Fibre | 1 g |
| Sugar | 19 g |
Vitamins & Minerals
- Calcium
- Iron
- Vitamin A
- Vitamin D
- Vitamin B2 (Riboflavin)
- Selenium
Dietary Information
- Vegetarian
- Nut-free (unless decorated with nuts)
- Not gluten-free
- Not vegan
- Can be adapted for dairy-free diets with suitable substitutions
Kitchen Tools Needed
You’ll only need a few essential baking tools:
- Two large mixing bowls
- Electric hand mixer or stand mixer
- Fine sieve
- Rubber spatula
- Balloon whisk
- 20 cm (8-inch) round cake tin
- Baking paper
- Cooling rack
- Measuring cups and spoons
- Kitchen scales
Step-by-Step Preparation
Prep Time
20 minutes
Bake Time
35–40 minutes
Total Time
1 hour
Servings
10
Step 1: Prepare the Oven
Preheat your oven to 170°C (340°F).
Grease and line an 8-inch round cake tin with baking paper.
Pro Tip: Avoid over-greasing the sides, as the batter needs something to cling to while rising.
Step 2: Separate the Eggs
Carefully separate the egg whites from the yolks.
Place them into two clean bowls.
Any trace of yolk in the whites can prevent proper whipping.
Step 3: Mix the Wet Ingredients
Whisk together:
- Egg yolks
- Milk
- Melted butter
- Vanilla extract
Mix until smooth.
Step 4: Combine the Dry Ingredients
Sift together:
- Cake flour
- Baking powder
- Salt
Gradually fold the dry ingredients into the yolk mixture until no dry streaks remain.
Avoid overmixing.
Step 5: Whip the Egg Whites
Using an electric mixer, beat the egg whites until foamy.
Add cream of tartar.
Slowly add the remaining sugar while mixing.
Continue beating until stiff, glossy peaks form.
The meringue should hold its shape without becoming dry.
Step 6: Fold Carefully
Using a spatula, gently fold one-third of the whipped egg whites into the batter to lighten it.
Then fold in the remaining whites in two additions using slow sweeping motions.
Take your time.
This is the secret to achieving that signature cloud-like texture.
Step 7: Bake
Pour the batter into the prepared tin.
Smooth the surface gently.
Bake for 35–40 minutes until:
- Golden on top
- Centre springs back lightly
- A skewer inserted comes out clean
Step 8: Cool Properly
Allow the cake to cool in the tin for 10 minutes.
Transfer to a wire rack until completely cool.
Dust generously with icing sugar before serving.
Expert Cooking Tips & Mistakes to Avoid
Don’t Rush the Egg Whites
Properly whipped meringue creates the cake’s airy structure. Under-whipped whites lead to a dense cake.
Fold—Don’t Stir
Stirring removes the air you’ve worked so hard to create. Fold gently with a spatula.
Measure Ingredients Accurately
Baking is a science. Weighing ingredients gives the most reliable results.
Avoid Opening the Oven Too Soon
Opening the oven door during the first 30 minutes may cause the cake to collapse.
Use Room-Temperature Ingredients
Room-temperature eggs and milk blend more smoothly, resulting in a lighter batter.
Cool Before Decorating
Adding whipped cream to a warm cake will cause it to melt.
Variations & Customisations
Spiced Version
Add warmth and depth with:
- 1 tsp ground cinnamon
- ¼ tsp nutmeg
- A pinch of ground ginger
- Orange zest
These spices create a cosy flavour perfect for autumn and winter gatherings.
Healthy Version
For a lighter take:
- Replace half the sugar with a baking-friendly sweetener.
- Use low-fat milk.
- Swap butter for Greek yogurt or light olive oil.
- Top with fresh fruit instead of frosting.
Kids-Friendly Version
Make Cloud Cake extra fun by:
- Decorating with colourful sprinkles
- Adding mini chocolate chips
- Serving with vanilla ice cream
- Topping with whipped cream and strawberries
Lemon Cloud Cake
Add:
- 2 tbsp fresh lemon juice
- 1 tbsp lemon zest
Finish with a light lemon glaze.
Chocolate Cloud Cake
Fold 30 g (¼ cup) cocoa powder into the flour mixture and garnish with chocolate curls.
Berry Cloud Cake
Layer the cake with whipped cream and fresh raspberries, blueberries, and strawberries for a refreshing summer dessert.
Storage & Reheating Instructions
Refrigerator
Store in an airtight container for up to 4 days.
If topped with whipped cream, refrigerate immediately.
Freezer
Wrap individual slices tightly in cling film and place them in a freezer-safe bag.
Freeze for up to 2 months.
Thaw overnight in the refrigerator.
Best Reheating Method
Cloud Cake is best enjoyed at room temperature.
If you’d like it slightly warm, microwave an individual slice for 10–15 seconds. Avoid overheating, as this can dry out the delicate crumb.
Serving Suggestions
Cloud Cake pairs beautifully with a variety of accompaniments:
- Fresh strawberries
- Mixed berries
- Whipped cream
- Vanilla bean ice cream
- Lemon curd
- Berry compote
- Chocolate sauce
- Caramel drizzle
- Fresh mint
For drinks, serve alongside:
- Freshly brewed coffee
- Earl Grey tea
- Chamomile tea
- Hot chocolate
- Sparkling lemonade
Its light texture also makes it a wonderful dessert after a hearty meal.
Frequently Asked Questions
1. Why is it called Cloud Cake?
The name comes from its incredibly light, airy, and fluffy texture, which resembles the softness of a cloud.
2. Can I make Cloud Cake ahead of time?
Yes. Bake the cake a day in advance and store it in an airtight container. Decorate just before serving for the freshest presentation.
3. Why did my cake collapse?
This usually happens if the egg whites were overmixed or undermixed, the batter was folded too aggressively, or the oven door was opened too early.
4. Can I use plain flour instead of cake flour?
Yes. While cake flour produces the softest crumb, plain flour works well in a pinch. For a closer substitute, remove 2 tablespoons of plain flour per cup and replace them with 2 tablespoons of cornflour.
5. Can I make this gluten-free?
Absolutely. Use a high-quality gluten-free flour blend designed for cakes. The texture may be slightly different but still delicious.
6. How do I know when the cake is fully baked?
The top should be lightly golden, the centre should spring back when gently pressed, and a skewer inserted into the middle should come out clean.
7. Can I frost Cloud Cake?
Yes. Its delicate texture pairs wonderfully with whipped cream, cream cheese frosting, mascarpone frosting, or a light buttercream. Avoid overly heavy frostings that may weigh the cake down.
Final Call to Action
Few desserts capture the feeling of comfort and celebration quite like a homemade Cloud Cake. With its feather-light crumb, delicate vanilla flavour, and melt-in-your-mouth texture, this cake proves that the simplest recipes can often be the most memorable.
Whether you’re baking for a birthday, a family gathering, an afternoon tea, or simply because you’re craving something sweet, this Cloud Cake is sure to become a favourite in your recipe collection. Dress it up with fresh berries and whipped cream for an elegant centrepiece, or enjoy a plain slice with your morning coffee—the possibilities are endless.
If you give this Cloud Cake recipe a try, I’d love to hear how it turned out! Leave a comment below, share your baking tips or favourite variations, and don’t forget to rate the recipe. If you enjoyed it, share it with friends and family on social media so they can experience the magic of this soft, fluffy dessert too.
Happy baking, and may every slice be as light and delightful as a cloud!