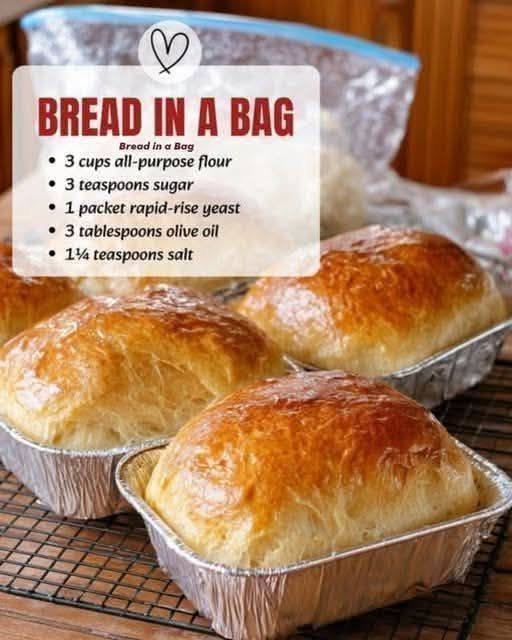
Bread in a Bag: The Fun, No-Mess Homemade Bread Everyone Can Make
Introduction: Homemade Bread Has Never Been This Fun
There’s something incredibly comforting about the smell of fresh bread baking in the oven. It fills your home with warmth, brings people into the kitchen, and creates memories that last long after the last slice is gone. But what if making homemade bread could be just as fun as eating it?
That’s exactly what Bread in a Bag delivers.
Instead of covering your countertops with flour and kneading dough by hand, everything comes together inside a simple resealable plastic bag. Just add the ingredients, seal the bag, and let the shaking and kneading begin! It’s a hands-on activity that’s perfect for kids, beginner bakers, classrooms, or anyone who wants to enjoy fresh homemade bread without the mess.
As the loaf bakes, your kitchen fills with the irresistible aroma of yeast, butter, and warm flour. The finished bread boasts a beautifully golden crust with a soft, fluffy interior that’s perfect for slathering with butter, making sandwiches, or serving alongside soups and stews. Simple, satisfying, and surprisingly easy, this recipe proves that homemade bread doesn’t have to be complicated.
Why You’ll Love This Recipe
- 🍞 No stand mixer or bread machine required
- 🥣 Minimal mess thanks to mixing in a bag
- 👨👩👧 Perfect baking activity for kids and families
- ⏱️ Ready in about 2 hours, including rising time
- 💰 Budget-friendly pantry ingredients
- 🍔 Great for sandwiches, toast, and dinner rolls
- ❄️ Freezer-friendly for meal prep
- 🌿 Easy to customize with herbs, cheese, or seeds
- 🧑🍳 Beginner-friendly with simple steps
- 🏡 Fresh homemade bread with a soft, fluffy texture
Ingredients (With Exact Measurements)
Makes: 1 loaf (10–12 slices)
Dry Ingredients
- 375 g (3 cups / 13.2 oz) all-purpose flour, divided
- 25 g (2 tablespoons / 0.9 oz) granulated sugar
- 7 g (2¼ teaspoons / ¼ oz) active dry yeast (1 packet)
- 5 g (1 teaspoon) fine salt
Wet Ingredients
- 240 ml (1 cup / 8 fl oz) warm water (105–110°F / 40–43°C)
- 30 ml (2 tablespoons / 1 fl oz) vegetable oil or melted butter
Optional Toppings
- Melted butter for brushing
- Sesame seeds
- Poppy seeds
- Rolled oats
- Everything bagel seasoning
Healthy Substitutes
- Whole wheat flour: Replace up to half the all-purpose flour for extra fiber.
- Honey: Substitute for sugar in equal amounts.
- Olive oil: Use instead of vegetable oil for a richer flavor.
- Bread flour: Creates a chewier loaf with better structure.
Nutritional Information (Per Slice)
Approximate values (based on 12 slices)
| Nutrient | Amount |
|---|---|
| Calories | 145 kcal |
| Protein | 4 g |
| Carbohydrates | 28 g |
| Fat | 2 g |
| Fiber | 1 g |
| Sugar | 2 g |
| Iron | 8% DV |
| Calcium | 1% DV |
| Folate | 10% DV |
Diet Compatibility
- ✅ Vegetarian
- ✅ Dairy-free (if using oil)
- ❌ Gluten-Free
- ❌ Keto
- ❌ Vegan (if brushed with butter; use oil instead)
Kitchen Tools Needed
- Large resealable plastic bag (1-gallon size)
- Measuring cups and spoons
- Loaf pan (9×5-inch)
- Mixing spoon (optional)
- Kitchen towel
- Cooling rack
- Pastry brush
Step-by-Step Preparation
Step 1: Prepare the Dry Ingredients
In a large resealable bag, combine:
- 120 g (1 cup) flour
- Sugar
- Yeast
- Salt
Seal the bag and shake well to evenly distribute the ingredients.
Step 2: Add the Wet Ingredients
Pour the warm water and oil into the bag.
Seal the bag tightly, leaving a little room for mixing, then squeeze and knead the ingredients together until smooth.
Pro Tip: Make sure the water is warm, not hot. Water that’s too hot can kill the yeast.
Step 3: Add Remaining Flour
Gradually add the remaining flour, about 60 g (½ cup) at a time.
Seal the bag after each addition and knead by hand until the dough becomes soft, smooth, and no longer sticky.
Step 4: Knead the Dough
Continue kneading the dough inside the bag for 8–10 minutes.
The dough should become elastic and spring back when gently pressed.
Step 5: First Rise
Remove the dough from the bag and shape it into a ball.
Place it in a lightly greased bowl, cover with a clean towel, and let it rise in a warm place for 45–60 minutes, or until doubled in size.
Step 6: Shape the Loaf
Punch down the risen dough to release excess air.
Shape it into a loaf and place it into a greased 9×5-inch loaf pan.
Cover loosely and let it rise again for 30–40 minutes, until the dough rises about 1 inch above the rim of the pan.
Step 7: Bake
Preheat your oven to 375°F (190°C).
Bake for 30–35 minutes, or until:
- The crust is deep golden brown.
- The loaf sounds hollow when tapped on the bottom.
- The internal temperature reaches 190–200°F (88–93°C).
Brush the top with melted butter immediately after baking for a soft, glossy crust.
Step 8: Cool
Remove the bread from the pan and let it cool on a wire rack for at least 30 minutes before slicing.
This helps the crumb set and makes slicing easier.
Expert Cooking Tips & Mistakes to Avoid
- Use fresh yeast for the best rise.
- Don’t add all the flour at once—humidity can affect how much you need.
- Avoid over-flouring to keep the loaf soft.
- Let the bread cool completely before slicing to prevent a gummy texture.
- Store in a bread bag or airtight container to maintain freshness.
Variations & Customizations
🌿 Herb Bread
Mix in:
- 1 teaspoon dried rosemary
- 1 teaspoon thyme
- 1 teaspoon oregano
Perfect for serving with pasta or soup.
🧀 Cheesy Bread
Fold in:
- 100 g (1 cup) shredded cheddar
- Parmesan cheese
- Garlic powder
Ideal for grilled cheese sandwiches or garlic toast.
🌾 Whole Wheat Version
Replace half the all-purpose flour with whole wheat flour for a heartier loaf with extra fiber and a nutty flavor.
👧 Kids-Friendly Version
Let children shake the bag, knead the dough, and decorate the top with sesame seeds or oats before baking. It’s a fun and educational kitchen activity.
Storage & Reheating Instructions
Room Temperature
Store in an airtight bread bag or container for 3–4 days.
Refrigerator
Refrigeration isn’t recommended, as it can dry out the bread more quickly.
Freezer
Wrap the cooled loaf tightly in plastic wrap and aluminum foil, or place slices in a freezer-safe bag. Freeze for up to 3 months.
Best Reheating Methods
- Toaster: Perfect for individual slices.
- Oven: Warm the loaf at 325°F (160°C) for 8–10 minutes.
- Microwave: Heat slices for 10–15 seconds for a soft texture.
Serving Suggestions
Enjoy this homemade Bread in a Bag with:
- Butter and your favorite jam
- Honey or fruit preserves
- Peanut butter
- Soup or chili
- Pasta dishes
- Grilled cheese sandwiches
- Turkey or ham sandwiches
- French toast made from day-old slices
Frequently Asked Questions
1. Can I use instant yeast instead of active dry yeast?
Yes. Instant yeast can be mixed directly with the dry ingredients and may reduce the rising time slightly.
2. Why didn’t my bread rise?
Common reasons include expired yeast, water that was too hot or too cold, or proofing the dough in a room that was too cool.
3. Can I make rolls instead of a loaf?
Absolutely. Divide the dough into 12 equal portions, shape into rolls, and bake at 375°F (190°C) for 18–22 minutes.
4. Is Bread in a Bag good for kids?
Yes! Since most of the mixing happens inside the bag, it’s a fun, hands-on recipe that minimizes mess and is great for teaching basic baking skills.
5. Can I add mix-ins?
Definitely. Cheese, herbs, roasted garlic, chopped olives, seeds, or dried fruit can all be added during the final kneading stage.
6. How do I know when the bread is done?
The loaf should be golden brown, sound hollow when tapped, and reach an internal temperature of 190–200°F (88–93°C).
Final Call to Action
There’s nothing quite like the taste of warm, homemade bread fresh from the oven—and Bread in a Bag makes the process easy, fun, and accessible for bakers of all ages. With simple ingredients, minimal cleanup, and a wonderfully soft loaf, this recipe is perfect for family baking days, classroom activities, or anyone looking to build confidence in the kitchen.
Give this recipe a try and enjoy the satisfaction of baking your own bread from scratch! If you loved it, leave a comment below, rate the recipe, and share your favorite variations. Don’t forget to pass this recipe along to friends and family who love fresh, homemade bread. Happy baking! 🍞