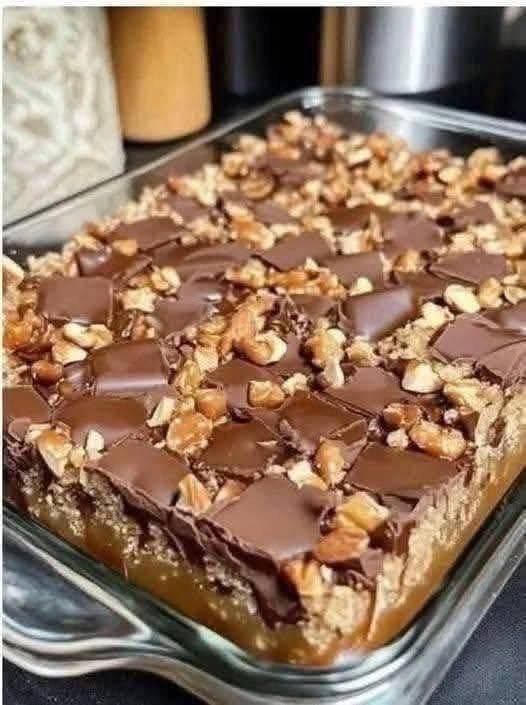
Caramel Chocolate Crunch Bars – The Ultimate No-Bake Sweet Treat Everyone Will Love
Introduction: A Dessert That Disappears in Minutes
There’s something magical about desserts that combine rich chocolate, buttery caramel, and an irresistible crunch in every bite. Caramel Chocolate Crunch Bars are one of those treats that instantly transport you back to childhood bake sales, holiday cookie trays, and family gatherings where everyone reached for “just one more.”
Picture this: a thick layer of silky melted chocolate wrapped around crispy cereal, topped with luscious homemade caramel that stretches ever so slightly as you take a bite, then finished with another crunchy chocolate layer. The contrast between the creamy caramel and crispy chocolate coating creates a dessert that’s impossible to resist.
The best part? These bars require minimal effort, no fancy baking skills, and just a handful of pantry staples. Whether you’re making them for a party, gifting them during the holidays, or simply satisfying a late-night sweet craving, these decadent bars are guaranteed to impress.
Why You’ll Love This Recipe
- 🍫 Rich, chocolatey, and incredibly indulgent
- ⏱️ Ready with only 20 minutes of active prep
- ❄️ No complicated techniques required
- 🎉 Perfect for parties, bake sales, and holidays
- 👨👩👧 Kid-friendly and fun to make together
- 💰 Made with affordable pantry ingredients
- 📦 Great for making ahead
- 🥜 Easy to customize with your favorite mix-ins
- 🍬 Perfect balance of chewy, crunchy, and creamy textures
- ❤️ Freezer-friendly for easy dessert prep
Ingredients (With Exact Measurements)
For the Chocolate Crunch Layers
- 3 cups crispy rice cereal (90 g / 3.2 oz)
- 2½ cups semi-sweet chocolate chips (425 g / 15 oz)
- 1 tablespoon coconut oil or butter (14 g / 0.5 oz)
For the Caramel Layer
- 1 cup soft caramel candies, unwrapped (200 g / 7 oz)
- ¼ cup heavy cream (60 ml / 2 fl oz)
- 2 tablespoons unsalted butter (28 g / 1 oz)
- ½ teaspoon vanilla extract
- ¼ teaspoon sea salt (optional, for salted caramel flavor)
Optional Toppings
- Flaky sea salt
- Mini chocolate chips
- Chopped toasted pecans
- Crushed pretzels
- Toffee bits
- Chocolate drizzle
Healthy Substitutes
- Use dark chocolate instead of semi-sweet chocolate.
- Choose a no-added-sugar chocolate for a lower-sugar version.
- Swap butter with coconut oil if preferred.
- Use dairy-free chocolate and coconut cream for a dairy-free variation.
Nutritional Information (Per Serving)
Approximate values (based on 16 bars):
| Nutrient | Amount |
|---|---|
| Calories | 245 kcal |
| Protein | 2 g |
| Carbohydrates | 28 g |
| Fat | 14 g |
| Fiber | 2 g |
| Sugar | 21 g |
| Calcium | 4% DV |
| Iron | 8% DV |
Dietary Information
✅ Vegetarian
❌ Not Vegan (unless dairy-free substitutions are used)
❌ Not Gluten-Free (unless using certified gluten-free crispy rice cereal)
❌ Not Keto
Kitchen Tools Needed
- 8×8-inch (20×20 cm) baking pan
- Parchment paper
- Microwave-safe bowls or double boiler
- Silicone spatula
- Mixing bowl
- Measuring cups and spoons
- Offset spatula or spoon
- Sharp knife
Step-by-Step Preparation
Step 1: Prepare the Pan
Line an 8×8-inch baking pan with parchment paper, leaving an overhang on the sides for easy removal.
Lightly grease the parchment if desired.
Step 2: Melt the Chocolate
Combine the chocolate chips and coconut oil in a microwave-safe bowl.
Microwave in 20-second intervals, stirring after each, until smooth and glossy. Alternatively, melt the mixture over a double boiler.
Pro Tip: Avoid overheating the chocolate, as it can become grainy or seize.
Step 3: Make the Crunch Base
Stir half of the melted chocolate into the crispy rice cereal until every piece is evenly coated.
Press the mixture firmly into the prepared pan using the back of a spoon or a flat-bottomed glass.
Refrigerate for 10–15 minutes, or until set.
Step 4: Prepare the Caramel
In a microwave-safe bowl, combine the caramel candies, heavy cream, and butter.
Heat in 30-second intervals, stirring each time, until the mixture is smooth and creamy.
Stir in the vanilla extract and sea salt.
Texture Cue: The caramel should pour easily but still be thick enough to coat a spoon.
Step 5: Add the Caramel Layer
Pour the warm caramel evenly over the chilled chocolate crunch base.
Use a spatula to spread it into an even layer.
Refrigerate for 10 minutes to help the caramel firm slightly.
Step 6: Add the Top Chocolate Layer
Spread the remaining melted chocolate evenly over the caramel.
Smooth the surface with an offset spatula.
Sprinkle with flaky sea salt, chopped pecans, or crushed pretzels if using.
Step 7: Chill and Slice
Refrigerate for 1–2 hours, or until completely firm.
Lift the bars from the pan using the parchment overhang.
For clean slices, use a sharp knife warmed under hot water and wiped dry between cuts.
Serve and enjoy!
Expert Cooking Tips & Mistakes to Avoid
Don’t Overheat the Chocolate
Heat gently and stir often to keep it silky smooth.
Press the Base Firmly
A compact base helps the bars hold together when sliced.
Let Each Layer Set
Chilling between layers prevents them from blending together.
Use Fresh Crispy Rice Cereal
Fresh cereal ensures the bars stay crunchy instead of becoming stale or chewy.
Slice When Fully Chilled
Warm bars are more likely to crumble or have messy layers.
Store Properly
Keep the bars chilled until ready to serve, especially in warm weather.
Variations & Customizations
Spicy Version
Add:
- ¼ teaspoon cayenne pepper
- A pinch of cinnamon
- Chili-infused dark chocolate
The subtle heat pairs beautifully with the rich caramel.
Healthier Version
- Use dark chocolate with at least 70% cocoa.
- Choose reduced-sugar caramel candies.
- Replace part of the crispy rice cereal with chopped nuts or seeds for extra texture and nutrients.
Kid-Friendly Version
- Top with colorful sprinkles or mini marshmallows.
- Mix mini chocolate candies into the cereal layer.
- Use milk chocolate for a sweeter, creamier flavor.
Storage & Reheating Instructions
Refrigerator
Store the bars in an airtight container for up to 1 week.
Separate layers with parchment paper to prevent sticking.
Freezer
Freeze for up to 3 months in a freezer-safe container.
Thaw in the refrigerator for several hours before serving.
Reheating
These bars are meant to be enjoyed cold or at cool room temperature, so no reheating is needed.
Serving Suggestions
These decadent bars are perfect on their own, but they also pair wonderfully with:
- A hot cup of coffee
- Espresso or cappuccino
- Cold milk
- Vanilla ice cream
- Salted caramel ice cream
- Fresh strawberries
- Whipped cream
- Holiday dessert platters
- Afternoon tea
For an extra-special presentation, drizzle the bars with melted white chocolate and finish with a sprinkle of flaky sea salt.
Frequently Asked Questions
1. Can I use homemade caramel?
Yes! Homemade caramel works beautifully. Just make sure it’s thick enough to hold its shape when chilled.
2. Why are my bars falling apart?
The base may not have been pressed firmly enough, or the bars may not have chilled long enough before slicing.
3. Can I make these ahead of time?
Absolutely. These bars are perfect for preparing a day or two in advance and storing in the refrigerator.
4. Can I use milk chocolate instead of semi-sweet?
Yes. Milk chocolate creates a sweeter bar, while dark chocolate offers a richer, more balanced flavor.
5. Are these bars gluten-free?
They can be if you use certified gluten-free crispy rice cereal and verify that your caramel candies are gluten-free.
6. Can I add nuts?
Definitely! Chopped pecans, almonds, walnuts, or peanuts add extra crunch and flavor.
7. How do I get neat, clean slices?
Chill the bars completely, then use a sharp knife warmed under hot water and wipe it clean between each cut.
Final Thoughts
Caramel Chocolate Crunch Bars are proof that you don’t need a complicated recipe to create an unforgettable dessert. Every bite delivers the perfect combination of crispy cereal, silky chocolate, and gooey caramel, making these bars a guaranteed crowd-pleaser for birthdays, holidays, potlucks, or simply treating yourself after a long day.
With their irresistible layers, easy preparation, and endless customization options, these no-bake bars are destined to become a staple in your dessert collection.
Try This Recipe Today!
If you make these Caramel Chocolate Crunch Bars, I’d love to hear how they turned out! Leave a comment with your favorite toppings or creative twists, rate the recipe, and share it with friends and family. Don’t forget to save this recipe for your next celebration, bake sale, or sweet craving—it’s one you’ll come back to again and again. Happy no-baking! 🍫🍯✨