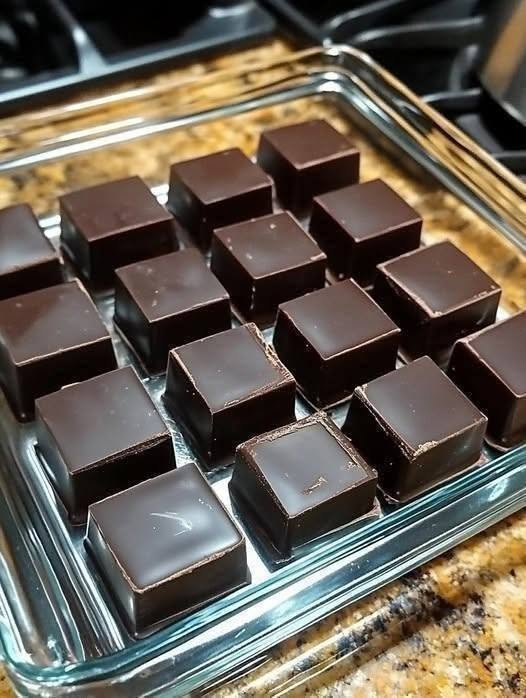
Homemade Dark Chocolate Recipe – Rich, Smooth, and Made With Simple Ingredients
Introduction: The Joy of Making Your Own Chocolate at Home
There’s something deeply satisfying about creating chocolate from scratch. The moment silky cocoa butter melts into a glossy mixture with rich cocoa aroma filling your kitchen, you realize homemade chocolate is a completely different experience from opening a store-bought bar.
This Homemade Dark Chocolate recipe creates a beautifully smooth, deeply chocolatey treat with a luxurious snap when chilled. Each bite delivers the bold flavor of cocoa, a gentle sweetness, and a melt-in-your-mouth texture that feels surprisingly sophisticated for such a simple recipe.
The best part? You control every ingredient. You can make it extra dark, adjust the sweetness, add your favorite toppings, and create a chocolate bar that perfectly matches your taste. Whether you’re making a healthy snack, a homemade gift, or simply satisfying a chocolate craving, this recipe is an easy way to enjoy real chocolate at home.
Why You’ll Love This Homemade Dark Chocolate
- 🍫 Made with simple pantry ingredients
- 🌱 No unnecessary additives or preservatives
- ⏱️ Ready in about 20 minutes
- 💰 More affordable than premium chocolate bars
- 🎁 Beautiful homemade gift idea
- 🥜 Easy to customize with nuts, fruits, and spices
- ☕ Perfect with coffee or tea
- ❤️ Rich in antioxidants from cocoa
- 🌾 Naturally gluten-free
- ✨ Adjustable sweetness and cocoa intensity
Ingredients (With Exact Measurements)
Basic Dark Chocolate
- ½ cup cocoa butter (100 g / 3.5 oz)
- 1 cup unsweetened cocoa powder (85 g / 3 oz)
- ¼ cup powdered sugar (30 g / 1 oz)
- 1 teaspoon pure vanilla extract (5 ml / 0.17 fl oz)
- ¼ teaspoon fine sea salt (1.5 g)
Optional Additions
- 2 tablespoons coconut milk powder (12 g / 0.4 oz) for creaminess
- ¼ teaspoon espresso powder for deeper chocolate flavor
- ½ teaspoon cinnamon
- ¼ teaspoon chili powder for spicy dark chocolate
- ¼ cup chopped almonds, hazelnuts, or walnuts (30 g / 1 oz)
- ¼ cup dried cranberries or cherries (35 g / 1.2 oz)
Healthy Substitutes
- Replace powdered sugar with powdered monk fruit or erythritol for a lower-sugar version.
- Use maple sugar or coconut sugar for a less refined option.
- Add natural nut butter for extra richness.
- Choose high-quality cocoa powder with at least 70% cocoa content for a stronger chocolate flavor.
Nutritional Information (Per Serving)
Approximate values (based on 12 servings):
| Nutrient | Amount |
|---|---|
| Calories | 125 kcal |
| Protein | 2 g |
| Carbohydrates | 8 g |
| Fat | 10 g |
| Fiber | 3 g |
| Sugar | 4 g |
| Iron | 15% DV |
| Magnesium | 20% DV |
| Copper | 25% DV |
Dietary Information
✅ Vegan (if using vegan sugar)
✅ Gluten-Free
✅ Dairy-Free
✅ Keto-Friendly Option Available
✅ Low-Carb Option Available
Kitchen Tools Needed
- Double boiler or heatproof bowl
- Saucepan
- Silicone spatula
- Whisk
- Measuring cups and spoons
- Chocolate molds or small lined baking tray
- Refrigerator-safe container
Step-by-Step Preparation
Step 1: Prepare Your Mold
Line a small baking dish with parchment paper or prepare silicone chocolate molds.
Set aside.
Pro Tip: Silicone molds create the cleanest chocolate shapes, but a parchment-lined tray works perfectly.
Step 2: Melt the Cocoa Butter
Place the cocoa butter in a heatproof bowl over a saucepan of gently simmering water.
Heat slowly until completely melted.
The temperature should stay around 104–113°F (40–45°C) for smooth results.
Texture Cue: The cocoa butter should look completely clear and silky.
Step 3: Add Cocoa Powder
Remove from heat.
Slowly whisk in the cocoa powder until smooth and glossy.
Make sure there are no dry cocoa lumps.
Step 4: Add Sweetener and Flavorings
Stir in:
- Powdered sugar
- Vanilla extract
- Sea salt
Mix thoroughly until the chocolate mixture becomes shiny and uniform.
Pro Tip: Powdered sweeteners dissolve much better than granulated sugar, creating a smoother chocolate texture.
Step 5: Add Optional Ingredients
Fold in any extras:
- Nuts
- Dried fruit
- Spices
- Espresso powder
Keep additions small so the chocolate remains easy to bite.
Step 6: Pour Into Molds
Pour the chocolate mixture into molds or the prepared tray.
Gently tap the tray on the counter to remove air bubbles.
Step 7: Chill Until Set
Place in the refrigerator for:
- 1–2 hours until firm
For a more professional finish, allow the chocolate to set at room temperature after tempering.
Step 8: Enjoy
Remove from molds and break into pieces or slice into bars.
Store properly and enjoy whenever a chocolate craving strikes.
Expert Cooking Tips & Mistakes to Avoid
Use High-Quality Cocoa Powder
Since cocoa is the main flavor, better cocoa creates noticeably better chocolate.
Don’t Let Water Touch the Chocolate
Even a small amount of water can cause chocolate to seize and become grainy.
Use Powdered Sweetener
Regular sugar may remain gritty because it doesn’t dissolve easily in fat-based chocolate.
Avoid Overheating
High temperatures can damage the flavor and make the cocoa butter separate.
Mix Thoroughly
Proper mixing creates a smooth texture and prevents oily spots.
Add Flavors Carefully
Strong ingredients like chili, coffee, and spices can quickly overpower the chocolate.
Variations & Customizations
Spicy Dark Chocolate
Add:
- ¼ teaspoon cayenne pepper
- ½ teaspoon cinnamon
- A pinch of sea salt
The heat creates a sophisticated chocolate experience.
Nutty Dark Chocolate
Add:
- Toasted almonds
- Pecans
- Hazelnuts
- Pistachios
Toast nuts first for maximum flavor.
Healthy Superfood Chocolate
Mix in:
- Chia seeds
- Pumpkin seeds
- Hemp hearts
- Unsweetened coconut flakes
Extra Dark Chocolate
For a more intense chocolate flavor:
- Increase cocoa powder slightly
- Reduce sweetener
- Add a pinch more salt
Storage Instructions
Room Temperature
Store in an airtight container in a cool, dark place for 1–2 weeks.
Avoid warm areas where the chocolate can melt.
Refrigerator
Store refrigerated for up to 1 month.
Keep chocolate sealed to prevent it from absorbing odors.
Freezer
Freeze for up to 6 months in an airtight freezer-safe container.
Allow it to come to room temperature before eating for the best texture.
Serving Suggestions
Homemade dark chocolate is delicious on its own, but it also pairs beautifully with:
- Fresh berries
- Espresso
- Coffee drinks
- Herbal tea
- Nuts
- Cheese boards
- Peanut butter
- Coconut flakes
- Homemade desserts
Break it into pieces and serve on a dessert platter for an elegant homemade treat.
Frequently Asked Questions
1. Can I make dark chocolate without cocoa butter?
Yes, but cocoa butter provides the classic chocolate texture and smooth melt. Coconut oil can work as a substitute, though the chocolate will need to stay refrigerated because it melts more easily.
2. How do I make it less bitter?
Increase the sweetener slightly or add vanilla, cinnamon, or a small pinch of salt to balance the bitterness.
3. Is homemade dark chocolate keto-friendly?
Yes, if you use a keto-friendly sweetener such as powdered erythritol or monk fruit instead of sugar.
4. Why is my chocolate grainy?
This usually happens because the sweetener wasn’t fine enough or the mixture was overheated. Use powdered ingredients and melt gently.
5. Can I use chocolate molds?
Absolutely. Silicone molds create professional-looking chocolate bars, squares, or shapes.
6. Can I temper homemade chocolate?
Yes. Tempering creates a glossy finish and satisfying snap. It involves carefully heating and cooling the chocolate to stabilize cocoa butter crystals.
7. Can I add milk powder?
Yes. Adding milk powder creates a creamier chocolate closer to milk chocolate, though it will no longer be dairy-free.
Final Thoughts
Making Homemade Dark Chocolate is a simple kitchen project that delivers an incredibly rewarding result. With just a few quality ingredients, you can create a rich, smooth chocolate treat customized exactly to your preferences.
Whether you’re looking for a healthier alternative to commercial candy, a thoughtful homemade gift, or a delicious everyday indulgence, this recipe proves that great chocolate doesn’t have to be complicated.
Try This Recipe Today!
If you make this Homemade Dark Chocolate, I’d love to hear how it turned out! Share your favorite mix-ins, sweetness level, or creative flavors in the comments, rate the recipe, and pass it along to fellow chocolate lovers. Save this recipe for your next homemade treat—you’ll never look at chocolate the same way again. 🍫✨