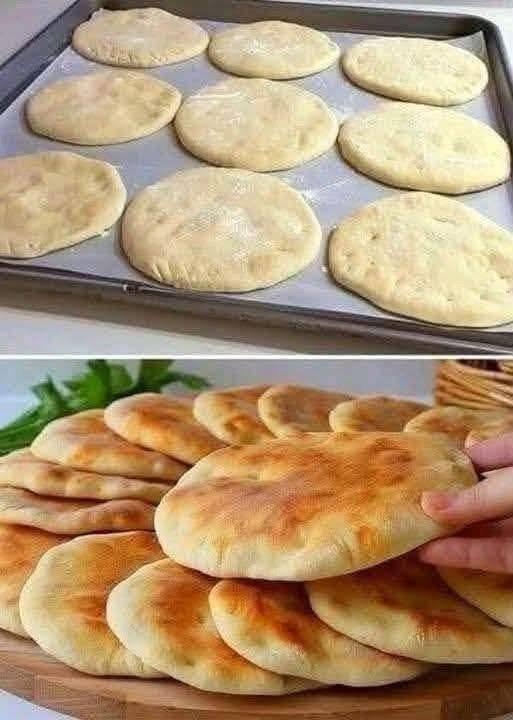
Homemade Pita Flatbread Recipe
Homemade pita flatbread is soft, warm, and delicious, and it is much easier to make than many people think. With a few simple ingredients such as flour, yeast, water, salt, and olive oil, you can make fresh pita bread in your own kitchen. The bread has a soft center and a lightly golden outside, making it perfect for sandwiches, wraps, dips, and family meals.
Fresh homemade pita has a wonderful taste that is hard to compare with packaged bread. When it comes straight from a hot skillet or oven, it is warm, soft, and slightly chewy. You can use it with hummus, grilled chicken, vegetables, cheese, beans, or almost any filling you enjoy. It can also be cut into small pieces and toasted to make crispy pita chips.
This easy pita flatbread recipe is perfect for beginners because the ingredients are simple and the steps are easy to follow. The dough only needs some time to rise before it is divided, rolled, and cooked. Once you learn how to make pita at home, you may find yourself making it often because it is fresh, affordable, and very useful for many different meals.
Why You Will Love This Homemade Pita Flatbread
There are many reasons to make pita bread at home. First, you can control every ingredient. You can choose the type of flour, the amount of salt, and the amount of olive oil.
Second, homemade pita tastes fresh and soft. Store bought pita can sometimes become dry, but freshly cooked pita has a pleasant texture and warm flavor.
Third, this recipe is very flexible. You can make small pita breads for snacks or larger ones for wraps and sandwiches. You can also add herbs or spices to the dough if you want a different flavor.
Most importantly, homemade pita does not require complicated equipment. A mixing bowl, rolling pin, and skillet are enough for the stovetop method.
Cooking Time and Serving
Preparation time: 20 minutes
Resting and rising time: 1 hour
Cooking time: 15 minutes
Total time: About 1 hour and 35 minutes
Servings: 8 pita breads
Difficulty: Easy
Cooking method: Stovetop
Homemade Pita Flatbread Recipe
Ingredients
For the pita dough, you will need:
3 cups all purpose flour
1 cup warm water
2 teaspoons instant yeast
1 teaspoon sugar
1 teaspoon salt
2 tablespoons olive oil
Extra flour for rolling
A little olive oil for the bowl
Optional Ingredients
You can add a few extra ingredients if you want more flavor.
1 teaspoon dried oregano
Half teaspoon garlic powder
1 tablespoon chopped fresh parsley
Half teaspoon dried basil
A small pinch of black pepper
These ingredients are optional. Plain pita is very versatile, so you can keep the dough simple if you prefer.
How to Make Homemade Pita Flatbread
Step 1: Prepare the Yeast
Pour the warm water into a large mixing bowl.
The water should be warm but not very hot. Very hot water can damage the yeast.
Add the sugar and instant yeast.
Stir gently and let the mixture sit for about 5 minutes.
If you are using instant yeast, it may not create a large layer of foam, and that is normal. The yeast is still ready to use.
Step 2: Add the Flour
Add about two and a half cups of flour to the bowl.
Add the salt and olive oil.
Use a wooden spoon or your hand to mix the ingredients.
The dough will start to come together. Add the remaining flour little by little until the dough becomes soft and slightly sticky.
Do not add all the flour at once. Different types of flour can absorb different amounts of water.
Step 3: Knead the Dough
Place the dough on a lightly floured work surface.
Knead the dough with your hands for about 7 to 10 minutes.
Push the dough forward with the palm of your hand, fold it back, and turn it slightly. Continue this process until the dough becomes smooth and elastic.
If the dough feels very sticky, add a little flour.
Do not add too much flour because a very dry dough can make the pita hard.
The finished dough should feel soft and flexible.
Step 4: Let the Dough Rise
Lightly coat a clean bowl with a little olive oil.
Place the dough inside the bowl and turn it once so the surface has a light coating of oil.
Cover the bowl with a clean kitchen towel or food cover.
Leave the dough in a warm place for about 1 hour.
The dough should become larger and look soft and puffy.
The exact rising time can change depending on the temperature of your kitchen. A warm room usually helps the dough rise faster.
Step 5: Divide the Dough
Once the dough has risen, gently press it down to remove some of the air.
Place it on a lightly floured surface.
Divide the dough into 8 equal pieces.
Shape each piece into a small ball.
Try to make the balls as even as possible so the pita breads cook at a similar rate.
Cover the dough balls with a clean towel and let them rest for about 10 minutes.
This short rest makes the dough easier to roll.
Step 6: Roll the Pita
Take one dough ball and place it on a lightly floured surface.
Use a rolling pin to roll it into a round shape.
Try to make each pita about 6 to 7 inches wide.
The dough should be fairly thin but not paper thin.
If the dough keeps shrinking while you roll it, let it rest for another 5 minutes. This gives the gluten time to relax and makes rolling easier.
Repeat the process with the remaining dough balls.
Step 7: Heat the Skillet
Place a large heavy skillet over medium high heat.
Allow the skillet to become hot before cooking the pita.
You do not need to add a lot of oil. In fact, pita bread usually cooks well on a dry hot skillet.
A properly heated skillet is important because the high heat helps the pita cook quickly and can help create the familiar pocket.
Step 8: Cook the First Side
Place one rolled pita onto the hot skillet.
Cook it for about 30 seconds to 1 minute.
You may see small bubbles forming on the surface.
Once the bottom begins to develop light brown spots, turn the pita over.
Step 9: Cook the Second Side
Cook the second side for about 30 seconds to 1 minute.
The pita may begin to puff up.
If it puffs into a large pocket, that is a good sign. The hot air inside the dough is creating space between the layers.
Turn it once more if needed and cook for another few seconds.
Do not cook it for too long because this can make the pita dry.
Step 10: Keep the Pita Soft
Remove the cooked pita from the skillet.
Place it inside a clean kitchen towel.
Cover it with the towel while you cook the remaining pita breads.
The steam helps keep the bread soft.
Continue cooking each pita and keep the finished breads covered.
Step 11: Serve Warm
Homemade pita tastes best while it is warm.
You can serve it immediately with hummus, yogurt sauce, grilled meat, vegetables, beans, cheese, or other favorite foods.
You can also allow the pita to cool and store it for later.
How to Get Pita to Puff Up
Getting pita to puff into a pocket can seem difficult at first, but a few simple tips can help.
First, make sure the skillet is very hot before cooking.
Second, roll the dough evenly. If some areas are much thicker than others, the pita may not puff properly.
Third, avoid adding too much flour while rolling.
Fourth, do not cook the pita for too long. Quick cooking over high heat helps create steam inside the dough.
Finally, make sure the dough has had enough time to rise. Properly rested dough is easier to roll and usually cooks better.
Even if your pita does not puff every time, do not worry. It can still taste soft and delicious and can be used as flatbread.
Oven Method for Homemade Pita
You can also cook pita in the oven.
Preheat the oven to 475 degrees Fahrenheit.
Place a heavy baking tray or baking stone inside the oven while it heats.
Roll the dough into rounds as described above.
Carefully place the dough rounds onto the hot baking surface.
Bake for about 2 to 4 minutes.
The pita should puff up and develop light brown spots.
Remove the pita carefully and place it inside a clean towel.
Keep the cooked pita covered so it stays soft.
The oven method can be useful when you want to cook several pita breads at the same time.
Tips for Soft Homemade Pita
Use warm water rather than cold water when preparing the dough.
Do not add too much flour during kneading.
Knead the dough until it becomes smooth and flexible.
Give the dough enough time to rise.
Allow the dough balls to rest before rolling.
Keep the rolled dough covered so it does not dry out.
Use a hot skillet.
Cook the pita quickly rather than leaving it on the pan for a long time.
Keep the cooked pita covered with a clean towel.
These simple steps can make a big difference in the final texture.
How to Store Homemade Pita
Allow the pita to cool completely before storing it.
Place the pita breads in an airtight container or reusable food bag.
Keep them at room temperature for up to 2 days.
For longer storage, place them in the refrigerator for several days.
However, refrigeration can make bread a little firmer. Warm the pita briefly before serving to improve the texture.
Can You Freeze Homemade Pita?
Yes, homemade pita freezes very well.
Allow the pita to cool completely.
Place sheets of baking paper between the breads if you want to separate them easily later.
Put the pita into a freezer safe bag or container.
Remove as much extra air as possible before sealing.
Store the pita in the freezer for up to 3 months for the best quality.
When you want to use it, allow it to thaw at room temperature.
You can then warm it in a skillet, oven, or microwave.
Ways to Serve Homemade Pita Flatbread
Homemade pita is one of the most useful breads because it can be served in many ways.
Serve With Hummus
Warm pita and hummus make a simple and delicious snack. Tear the pita into pieces and use it to scoop up the hummus.
Make Pita Sandwiches
Cut the pita open and fill it with grilled chicken, lettuce, tomato, cucumber, onion, and your favorite sauce.
Make Breakfast Pita
Fill warm pita with scrambled eggs, cheese, vegetables, and avocado for a filling breakfast.
Serve With Grilled Meat
Pita works very well with grilled chicken, beef, lamb, or other cooked meats.
Make Pita Chips
Cut the pita into small triangles.
Brush them lightly with olive oil and sprinkle with salt.
Bake until crisp.
Serve with hummus, salsa, or another dip.
Use Pita as a Pizza Base
Place a pita on a baking tray.
Add tomato sauce, cheese, vegetables, and other toppings.
Bake until the cheese melts.
This makes a quick and easy homemade pizza.
Flavor Ideas
Plain pita is delicious, but you can also add different flavors.
For garlic pita, add a small amount of garlic powder to the dough.
For herb pita, add oregano, parsley, or basil.
For a richer flavor, brush warm pita with olive oil and sprinkle it with sea salt.
You can also add sesame seeds or other suitable toppings before cooking.
Common Mistakes to Avoid
One common mistake is using water that is too hot. Very hot water can affect the yeast.
Another mistake is adding too much flour. This can make the pita hard instead of soft.
Do not skip the rising time. The dough needs time to develop a soft and flexible texture.
Do not roll the dough too thick because thick dough may not cook evenly.
Do not use a cold skillet. A hot skillet is important for quick cooking and puffing.
Avoid cooking the pita for too long. Overcooking can make it dry and firm.
Finally, keep cooked pita covered with a towel. This helps trap moisture and keeps the bread soft.
Recipe Notes
The amount of flour may vary slightly depending on the flour and the humidity in your kitchen.
Add flour slowly until the dough is soft and easy to handle.
If the dough is very sticky, add a small amount of flour.
If the dough feels hard or dry, add a teaspoon of water and knead again.
Allow the dough to rest if it becomes difficult to roll.
A hot skillet is one of the most important parts of this recipe.
Keep cooked pita covered while preparing the remaining breads.
For the softest pita, serve it warm.
You can make the dough several hours ahead and keep it covered in the refrigerator. Let it come closer to room temperature before shaping and cooking.
Frequently Asked Questions
What is pita flatbread?
Pita is a soft round bread that is commonly used for sandwiches, wraps, dipping, and serving with many different foods. When cooked correctly, it can puff and form a pocket inside.
Is homemade pita easy to make?
Yes. Homemade pita requires basic ingredients and simple steps. The dough needs time to rise, but the actual cooking process is quick.
Why did my pita not puff?
The skillet may not have been hot enough, the dough may have been rolled unevenly, or the dough may have been too thick or too thin. Make sure the pan is properly heated and roll the dough evenly.
Can I make pita without yeast?
Yes, but the texture will be different. Yeast helps create the soft and flexible texture of traditional pita. A yeast free version may be flatter and more similar to simple flatbread.
Can I use whole wheat flour?
Yes. You can replace some of the all purpose flour with whole wheat flour. Using only whole wheat flour can make the pita heavier, so you may need to adjust the water slightly.
Why is my homemade pita hard?
Pita can become hard if too much flour is used or if it is cooked for too long. Keeping the dough soft and cooking the pita quickly can help.
How do I keep pita soft?
Keep cooked pita inside a clean kitchen towel while you finish cooking. The trapped steam helps keep it soft.
Can I make pita without a rolling pin?
Yes. You can gently flatten the dough with your hands. A rolling pin simply makes it easier to create an even round shape.
Can I prepare pita dough ahead of time?
Yes. You can prepare the dough and keep it covered in the refrigerator. Allow it to warm slightly before shaping and cooking.
How long does homemade pita last?
Homemade pita can usually stay fresh for about 2 days at room temperature when stored properly. For longer storage, freeze it.
Can I freeze pita bread?
Yes. Pita freezes well and can be stored for about 3 months for good quality. Separate the breads with baking paper if you want to remove them one at a time.
What can I eat with homemade pita?
You can serve pita with hummus, yogurt sauce, grilled chicken, vegetables, cheese, beans, eggs, soups, salads, or many other dishes.
Can I use pita as a wrap?
Yes. Soft pita can be filled with meat, vegetables, sauces, and salads. Warm it slightly before filling if it feels firm.
Nutrition Information
The following nutrition information is an estimate based on the recipe ingredients and eight servings. Actual values can change depending on the exact flour, oil, and other ingredients used.
| Nutrition | Full Recipe | Per Serving |
|---|---|---|
| Calories | About 1,470 kcal | About 184 kcal |
| Protein | About 39 g | About 5 g |
| Carbohydrates | About 255 g | About 32 g |
| Fat | About 32 g | About 4 g |
| Fiber | About 9 g | About 1 g |
| Sugar | About 8 g | About 1 g |
| Sodium | About 2,400 mg | About 300 mg |
| Saturated Fat | About 5 g | About 1 g |
| Calcium | About 95 mg | About 12 mg |
| Iron | About 14 mg | About 2 mg |
Nutrition Per Serving
Serving size: 1 pita
Calories: About 184 kcal
Protein: About 5 g
Carbohydrates: About 32 g
Fat: About 4 g
Fiber: About 1 g
Sugar: About 1 g
Sodium: About 300 mg
These nutrition values are estimates for general information. The actual nutrition can vary based on ingredient brands, serving size, and cooking methods.
Why Homemade Pita Is Worth Making
Making pita at home may seem like extra work, but the result is worth it. Fresh pita is warm, soft, and full of simple homemade flavor.
The recipe also gives you more control over your food. You can choose your ingredients and adjust the flavor to your liking.
Homemade pita is also useful because it can become many different meals. One batch can be used for sandwiches, wraps, dipping, breakfast, pizza, or crispy pita chips.
Once you become comfortable with the dough, you can make pita whenever you need fresh bread.
Final Thoughts
Homemade pita flatbread is a simple recipe that can bring fresh bread to your table without complicated equipment. The dough is made with basic ingredients, allowed to rise, divided into small balls, rolled into rounds, and cooked on a hot skillet.
The most important things to remember are to keep the dough soft, allow enough time for rising, roll the pita evenly, and use a hot cooking surface. Keeping the cooked pita covered also helps maintain its soft texture.
You can enjoy fresh pita with hummus, grilled meat, vegetables, cheese, eggs, soups, salads, or your favorite fillings. You can even turn leftover pita into crispy chips or quick homemade pizza.
Once you try this easy homemade pita flatbread recipe, you may find that fresh pita becomes a regular part of your kitchen. It is affordable, flexible, delicious, and easy enough for beginners to make at home.
Disclaimer
Enjoy homemade pita as part of a balanced diet and eat it in moderation according to your personal dietary needs. This recipe contains wheat and gluten and may not be suitable for people with wheat allergies, gluten intolerance, or celiac disease. Check all ingredient labels carefully and make suitable substitutions when needed.