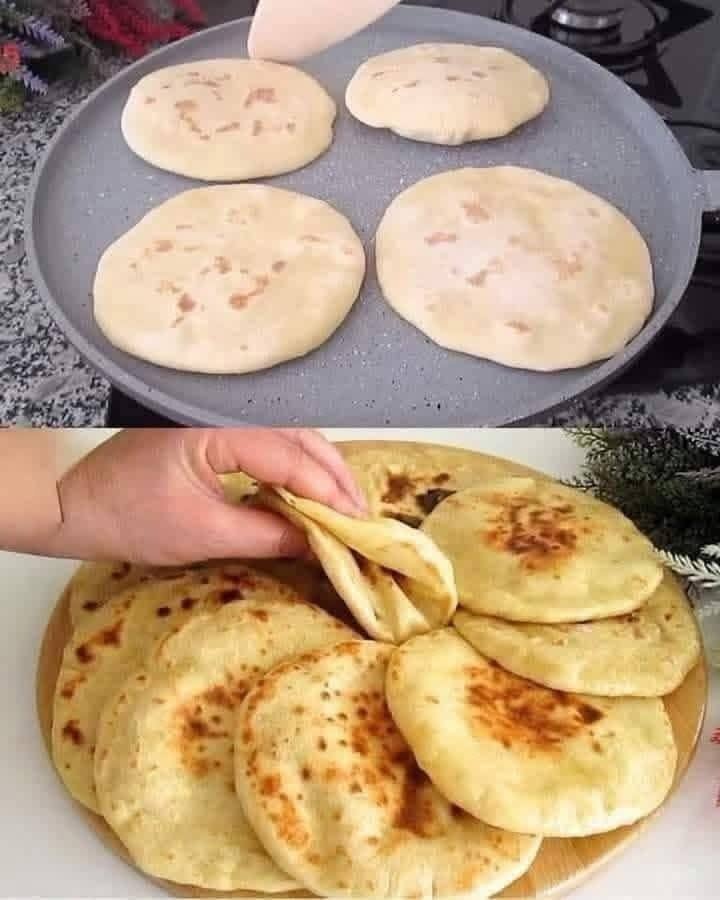
No-Oven Stovetop Flatbreads: Soft, Chewy & Perfectly Golden
There’s something deeply satisfying about tearing into a warm, freshly cooked flatbread.
The edges are lightly crisp from the hot skillet, the center is soft and chewy, and the whole kitchen smells like warm bread and toasted flour. Add a swipe of butter, scoop up a fragrant curry, or wrap one around grilled vegetables, and suddenly a simple piece of dough becomes the best part of the meal.
And here’s the beautiful part: you don’t need an oven.
These easy no-oven stovetop flatbreads cook entirely in a skillet or heavy frying pan. The dough takes just minutes to mix, requires no complicated equipment, and cooks one at a time directly on the stovetop.
If you’ve ever thought homemade flatbread was too much work, this recipe is here to change your mind.
Once you make your first batch, you’ll wonder why you ever bought packaged flatbreads in the first place.
Why You’ll Love These Stovetop Flatbreads
- No oven required: Everything cooks on the stovetop.
- Simple ingredients: Flour, water, salt, oil, and a little baking powder are all you need.
- Quick and easy: The dough comes together in about 10 minutes.
- Soft and flexible: Perfect for wraps, dipping, and scooping.
- Budget-friendly: Made from inexpensive pantry staples.
- Freshly cooked: Nothing beats bread straight from the skillet.
- Customizable: Add herbs, garlic, cheese, or spices.
- Freezer-friendly: Make a big batch and save some for later.
- Perfect for beginners: No complicated bread-making techniques required.
- Great for any meal: Serve them with breakfast, lunch, dinner, or as a snack.
Ingredients for No-Oven Stovetop Flatbreads
This recipe makes approximately 8 medium flatbreads.
For the Dough
- 300 g all-purpose flour — approximately 2½ cups / 10½ oz
- 1 teaspoon baking powder — approximately 4 g
- 1 teaspoon salt — approximately 5 g
- 2 tablespoons olive oil — approximately 30 ml / 1 fl oz
- 180 ml warm water — approximately ¾ cup / 6 fl oz
You’ll also need a little extra flour for rolling and a small amount of oil or butter for finishing, if desired.
Optional Additions
For extra flavor, try adding:
- 1 tablespoon chopped fresh parsley
- 1 teaspoon dried oregano
- ½ teaspoon garlic powder
- ½ teaspoon onion powder
- 1 teaspoon toasted sesame seeds
- Melted butter for brushing after cooking
For a richer, softer flatbread, replace about 30 ml / 2 tablespoons of the water with plain yogurt.
Ingredient Substitutions
Whole Wheat Flatbreads
Replace up to half of the all-purpose flour with whole wheat flour.
Using 100% whole wheat flour produces a heartier flatbread, but you’ll likely need a little extra water because whole wheat flour absorbs more liquid.
Gluten-Free Flatbreads
Use a good gluten-free all-purpose flour blend designed for bread or flatbread.
Because gluten-free dough behaves differently, you may need to adjust the water slightly. Let the dough rest before rolling so the flour can fully hydrate.
Dairy-Free
This recipe is naturally dairy-free if you cook the flatbreads with oil rather than butter.
Oil-Free
You can omit the olive oil from the dough, although the finished flatbreads may be slightly less tender.
Nutritional Information
Approximate nutrition per flatbread, assuming the recipe produces 8 flatbreads:
- Calories: approximately 155–170
- Protein: approximately 4 g
- Carbohydrates: approximately 27–30 g
- Fat: approximately 4–5 g
- Fiber: approximately 1 g
Exact nutrition will vary depending on the flour and amount of oil used.
These flatbreads are:
- Vegetarian: Yes
- Vegan: Yes, when made with oil rather than butter
- Dairy-free: Yes, when served without butter or dairy
- Egg-free: Yes
- Nut-free: Yes, provided your ingredients are produced in a nut-free facility
- Gluten-free: Not with regular flour, but they can be adapted with gluten-free flour
Kitchen Tools You’ll Need
Keep it simple. You’ll need:
- Large mixing bowl
- Measuring cups and spoons
- Kitchen scale, preferably
- Rolling pin
- Heavy skillet or cast-iron pan
- Spatula or tongs
- Clean kitchen towel
- Pastry brush, optional
A cast-iron skillet is particularly good for this recipe because it holds heat extremely well and creates those beautiful toasted spots on the flatbread.
How to Make Stovetop Flatbreads Without an Oven
Step 1: Mix the Dry Ingredients
Add the flour, baking powder, and salt to a large mixing bowl.
Whisk or stir everything together until evenly combined.
This small step matters because you don’t want pockets of baking powder or salt concentrated in one part of the dough.
Step 2: Add the Oil and Water
Make a well in the center of the flour mixture.
Pour in the olive oil followed by the warm water.
Start mixing with a wooden spoon or fork.
As the liquid gets absorbed, switch to your hands and bring everything together into a rough dough.
The dough should feel soft and slightly tacky but shouldn’t stick heavily to your fingers.
If it feels dry or crumbly, add water one teaspoon at a time.
If it feels excessively sticky, sprinkle in a little flour.
Pro tip:
Don’t dump in lots of extra flour at once.
A slightly soft dough produces much more tender flatbreads than a stiff, heavily floured dough.
Step 3: Knead the Dough
Transfer the dough to a lightly floured work surface.
Knead for approximately 5–7 minutes.
You’re not trying to develop the same structure as a loaf of bread. You simply want a smooth, cohesive dough.
After kneading, the dough should feel soft and elastic.
Press your fingertip into it.
If the indentation slowly springs back, you’re in good shape.
Step 4: Let the Dough Rest
Place the dough back in the bowl.
Cover it with a clean kitchen towel and let it rest for 20–30 minutes.
Don’t skip this step if you can help it.
Resting allows the flour to hydrate and gives the gluten time to relax. That makes the dough much easier to roll.
If your dough keeps shrinking back while you’re rolling it, it probably needs a little more resting time.
Step 5: Divide the Dough
Place the rested dough on your work surface.
Divide it into 8 equal pieces.
For consistent flatbreads, each piece should weigh approximately 60–65 g / 2.1–2.3 oz.
Roll each piece into a smooth ball.
Keep the dough balls covered with a towel while you work so they don’t develop a dry surface.
Step 6: Roll the Flatbreads
Lightly flour your work surface.
Take one dough ball and flatten it with your fingertips.
Use a rolling pin to roll it into a thin circle approximately 18–20 cm / 7–8 inches across.
Don’t worry if your circles aren’t perfectly round.
Rustic edges are part of the charm of homemade flatbread.
Important texture tip:
Try to roll the flatbread evenly.
If the center is dramatically thinner than the edges, it may cook unevenly.
If the dough keeps springing back, stop rolling and let it rest for another 5–10 minutes.
Step 7: Heat the Skillet
Place a heavy skillet over medium-high heat.
Allow it to heat for approximately 3–5 minutes.
You don’t need oil in the pan for the basic flatbread.
The skillet should be hot enough that the dough begins cooking immediately when it touches the surface.
To test it, flick a tiny drop of water onto the pan.
It should sizzle and evaporate quickly.
Step 8: Cook the First Side
Carefully place one rolled flatbread into the hot skillet.
Cook for approximately 45–90 seconds.
You’ll start seeing small bubbles appear across the surface.
The underside should develop golden-brown spots.
That’s your signal to flip.
Step 9: Cook the Other Side
Flip the flatbread using a spatula or tongs.
Cook for another 45–90 seconds.
Press gently on larger bubbles if needed.
You may see the flatbread puff dramatically in certain areas. That’s a great sign—the trapped steam is helping create a soft interior.
Don’t walk away from the skillet.
Flatbreads cook quickly, and the difference between beautifully toasted and burnt can happen in seconds.
Step 10: Keep Them Soft
Transfer each finished flatbread to a clean plate and immediately cover it with a clean kitchen towel.
This traps some steam and keeps the flatbreads soft and flexible.
Continue cooking the remaining dough.
If you’re serving them immediately, brush each one lightly with melted butter or olive oil while warm.
Expert Tips for Perfect Stovetop Flatbreads
1. Don’t Make the Dough Too Stiff
One of the most common mistakes is adding too much flour.
A stiff dough produces tough flatbreads.
The dough should be soft and pliable.
Use just enough flour to prevent excessive sticking.
2. Give the Dough Time to Rest
Resting is essential.
If you skip it, the dough may fight you when you try to roll it.
A short rest relaxes the gluten and makes shaping dramatically easier.
3. Get the Pan Properly Hot
A lukewarm skillet creates pale, dry flatbreads.
A properly heated skillet produces the characteristic golden-brown patches while cooking the interior quickly.
4. Don’t Overcook Them
This is perhaps the biggest enemy of soft flatbread.
Once the bread has cooked through and developed golden spots, remove it.
Leaving it in the skillet too long drives out moisture and creates a crisp, brittle flatbread.
5. Keep Cooked Flatbreads Covered
A clean towel is your best friend.
Stack the flatbreads as they come off the skillet and keep them covered.
The residual steam keeps them wonderfully soft.
Common Mistakes and How to Fix Them
My Flatbreads Are Tough
You probably used too much flour or cooked them too long.
Fix: Use a softer dough and shorten the cooking time.
The Dough Won’t Roll Out
The gluten is likely too tight.
Fix: Cover the dough and let it rest for another 10–15 minutes.
The Flatbreads Burn Before Cooking Through
Your skillet is too hot.
Fix: Reduce the heat slightly. Every stovetop behaves differently, so adjust based on the color of the flatbread.
They Aren’t Puffing
Not every flatbread will puff dramatically, so don’t worry.
However, puffing is more likely when the skillet is sufficiently hot and the dough is rolled evenly.
My Flatbreads Are Dry
They’re probably too thin or overcooked.
Fix: Roll them slightly thicker and remove them from the skillet as soon as they’re cooked.
Delicious Variations
Garlic Herb Stovetop Flatbreads
Add ½ teaspoon garlic powder and 1 tablespoon finely chopped parsley to the dough.
After cooking, brush the flatbreads with melted butter mixed with fresh garlic and parsley.
They’re incredible alongside soup.
Cheesy Flatbreads
Roll the dough slightly thinner.
Place a small handful of shredded cheese in the center, fold the dough over it, seal the edges, and gently roll it flat again.
Cook as usual.
The result is a warm, cheesy flatbread with a beautifully crisp exterior.
Spicy Flatbreads
Add:
- ½ teaspoon chili flakes
- ½ teaspoon smoked paprika
- A pinch of cayenne
Serve with grilled meats, roasted vegetables, or a cooling yogurt dip.
Whole Wheat Flatbreads
Replace half of the white flour with whole wheat flour.
Expect a slightly denser texture and deeper, nuttier flavor.
Soft Yogurt Flatbreads
Replace approximately 30 ml / 2 tablespoons of water with plain yogurt.
The yogurt adds tenderness and a subtle tang.
How to Store Stovetop Flatbreads
Refrigerator
Allow the flatbreads to cool completely.
Stack them with parchment paper between the layers and store them in an airtight container or reusable bag.
They will keep for approximately 3–4 days in the refrigerator.
Freezer
These flatbreads freeze beautifully.
Place parchment paper between individual flatbreads and transfer them to a freezer-safe bag.
Freeze for up to 2–3 months for the best quality.
Label the bag with the date so you know when you made them.
Best Reheating Method
For the best texture, reheat the flatbreads in a dry skillet over medium heat.
Cook for approximately 20–30 seconds per side.
You can also sprinkle a few drops of water onto the flatbread before covering the skillet briefly with a lid. The steam helps restore softness.
Avoid overheating them, as this can make them chewy and dry.
What to Serve With Homemade Flatbreads
These stovetop flatbreads are wonderfully versatile.
Serve them alongside:
- Chickpea or lentil curry
- Butter chicken
- Grilled chicken
- Kebabs
- Falafel
- Hummus
- Baba ganoush
- Tzatziki
- Creamy soups
- Stews
- Scrambled eggs
- Grilled vegetables
- Roasted meat
You can also turn them into wraps.
Fill one with grilled chicken, crunchy lettuce, tomato, cucumber, and your favorite sauce.
Or keep things incredibly simple: tear off a warm piece and use it to scoop up a rich, fragrant curry.
Frequently Asked Questions
Can I make flatbread without an oven?
Absolutely.
That’s the entire beauty of this recipe. A hot skillet is all you need. The flatbread cooks directly on the stovetop in just a few minutes.
Can I make these flatbreads without yeast?
Yes.
This recipe uses baking powder rather than yeast, so there is no lengthy yeast-proofing process.
That makes these flatbreads particularly convenient when you want fresh bread quickly.
Why is my flatbread not soft?
The most common causes are too much flour, insufficient resting time, or overcooking.
Keep the dough soft, let it rest, and cook each flatbread only until golden spots appear and the center is cooked.
Can I prepare the dough ahead of time?
Yes.
Prepare the dough, cover it tightly, and refrigerate it for up to 24 hours.
Let it sit at room temperature for approximately 20–30 minutes before dividing and rolling.
Can I use whole wheat flour?
Yes.
For the softest result, start by replacing about half of the all-purpose flour with whole wheat flour.
You may need a little additional water.
Can I cook flatbreads on a cast-iron skillet?
Definitely.
Cast iron is excellent for stovetop flatbreads because it retains heat extremely well.
Just make sure the pan is properly heated before adding the dough.
Can I make these flatbreads ahead for meal prep?
Yes.
Cook the entire batch, allow them to cool, and store them in the refrigerator or freezer.
They’re excellent for quick lunches and weeknight dinners because they can be reheated in under a minute.
Final Thoughts
There are few things more rewarding than making bread from scratch—and these no-oven stovetop flatbreads make the process wonderfully uncomplicated.
No preheating an oven.
No complicated equipment.
No waiting around for yeast to rise.
Just a bowl of simple ingredients, a little kneading, a short rest, and a hot skillet.
Then comes the best part: watching those little golden spots appear as the flatbread cooks.
Stack them under a towel while they’re still warm, brush them with butter if you like, and get ready for that first irresistible bite.
They’re soft enough to wrap around your favorite fillings, sturdy enough for dipping, and delicious enough to eat straight from the skillet.
Give these easy stovetop flatbreads a try, then come back and tell me how you served them! If you loved the recipe, share it with someone who thinks homemade bread requires an oven—you might just change their mind.