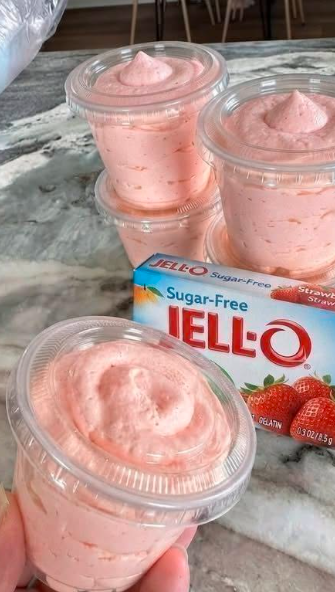
strawberry Cheesecake Protein Fluff Cups – The Creamiest High-Protein Dessert You’ll Make This Week
Strawberry Cheesecake Protein Fluff Cups: A Guilt-Free Dessert That Tastes Like Pure Indulgence
Imagine opening your refrigerator after a long day, craving something sweet, creamy, and satisfying. You want the comfort of cheesecake, the freshness of ripe strawberries, and the joy of a fluffy dessert—but without the sugar crash or heavy calories.
That’s exactly where these Strawberry Cheesecake Protein Fluff Cups shine.
The very first spoonful is like biting into a cloud of strawberry cheesecake. The silky cream cheese melts into rich Greek yogurt while juicy strawberries add bright bursts of natural sweetness. Every bite is light, airy, and unbelievably creamy, with the subtle crunch of crushed graham crackers (or your favorite healthy topping) creating that classic cheesecake experience.
The best part? These beautiful little dessert cups pack an impressive protein boost, making them perfect for breakfast, post-workout fuel, healthy snacking, or a guilt-free late-night treat.
Whether you’re trying to eat healthier, increase your protein intake, or simply love cheesecake, this recipe is about to become your newest obsession.
Why You’ll Love This Recipe
There are countless reasons these Strawberry Cheesecake Protein Fluff Cups deserve a permanent place in your meal prep rotation.
- ✔ Ready in just 10 minutes
- ✔ No baking required
- ✔ Packed with high-quality protein
- ✔ Light, fluffy, and ultra-creamy
- ✔ Naturally sweet with fresh strawberries
- ✔ Perfect for meal prep
- ✔ Budget-friendly ingredients
- ✔ Kid-approved
- ✔ Great post-workout snack
- ✔ Easy to customize
- ✔ Lower in calories than traditional cheesecake
- ✔ Gluten-free option available
- ✔ Can be made vegetarian
- ✔ Beautiful enough for parties
Ingredients (With Exact Measurements)
For the Protein Fluff
- 200 g (7 oz / about ¾ cup) low-fat cream cheese, softened
- 250 g (8.8 oz / 1 cup) plain Greek yogurt
- 30 g (1 scoop / 1 oz) vanilla protein powder
- 150 g (5.3 oz / 1 cup) fresh strawberries, diced
- 2 tablespoons (30 ml) honey or sugar-free maple syrup
- 1 teaspoon vanilla extract
- 1 tablespoon lemon juice
- ½ teaspoon lemon zest (optional)
- ½ cup (120 ml) cold whipped topping or whipped coconut cream
- Pinch of salt
Optional Cheesecake Crust Layer
- 50 g (1.8 oz / about ½ cup) crushed graham crackers
- 1 tablespoon melted butter
Garnish
- Fresh strawberry slices
- Crushed graham crackers
- Mint leaves
- White chocolate shavings (optional)
Healthy Ingredient Substitutes
Want to make the recipe fit your lifestyle? Here are a few easy swaps.
- Replace cream cheese with light cream cheese for fewer calories.
- Use dairy-free cream cheese for a lactose-free version.
- Choose coconut yogurt for a dairy-free alternative.
- Swap honey with monk fruit syrup or stevia for lower sugar.
- Use gluten-free graham crackers if needed.
- Replace whipped topping with whipped coconut cream.
Nutritional Information (Per Serving)
Makes 4 servings.
Approximate nutrition per serving:
| Nutrient | Amount |
|---|---|
| Calories | 235 kcal |
| Protein | 23 g |
| Carbohydrates | 16 g |
| Fat | 9 g |
| Fiber | 2 g |
| Sugar | 10 g |
| Calcium | 18% DV |
| Vitamin C | 45% DV |
| Potassium | 8% DV |
Dietary Information
- High Protein ✔
- Vegetarian ✔
- Gluten-Free (with GF crackers) ✔
- Low Sugar Option ✔
- Keto-Friendly (with keto sweetener and no graham crackers) ✔
- Can Be Made Dairy-Free ✔
Kitchen Tools Needed
You’ll only need a few simple kitchen essentials.
- Large mixing bowl
- Electric hand mixer or stand mixer
- Silicone spatula
- Measuring cups and spoons
- Digital kitchen scale (recommended)
- Small serving cups or mason jars
- Mixing spoon
- Refrigerator
Step-by-Step Preparation
Step 1: Prepare the Cheesecake Base
Allow the cream cheese to sit at room temperature for about 20 minutes.
This makes it incredibly smooth and prevents lumps.
Beat the cream cheese for about 2 minutes until silky.
Step 2: Add the Yogurt
Mix in the Greek yogurt.
Continue beating for another minute until smooth and creamy.
The mixture should resemble whipped cheesecake filling.
Step 3: Add Protein Powder
Slowly add the vanilla protein powder.
Mix on low speed first to avoid clumps.
Once incorporated, increase the speed for another minute.
Pro Tip: If the mixture seems too thick, add one tablespoon of milk at a time until perfectly creamy.
Step 4: Flavor the Filling
Add:
- Vanilla extract
- Honey
- Lemon juice
- Lemon zest
- Pinch of salt
Beat for another minute.
You’ll notice the mixture becoming lighter and fluffier.
Step 5: Fold in the Whipped Topping
Using a spatula, gently fold in the whipped topping.
Avoid overmixing.
This step creates that signature fluffy, mousse-like texture.
Step 6: Add Strawberries
Fold in the diced strawberries carefully.
Try not to crush them.
Little strawberry pieces create delicious bursts of juicy sweetness throughout the dessert.
Step 7: Prepare the Crust (Optional)
Mix together:
- Crushed graham crackers
- Melted butter
Spoon about one tablespoon into the bottom of each serving cup.
Press lightly.
Step 8: Fill the Cups
Divide the protein fluff evenly among four dessert cups.
Smooth the tops using the back of a spoon.
Step 9: Chill
Cover and refrigerate for at least 1 hour.
For the best flavor and texture, chill for 2–4 hours.
The filling becomes thicker, richer, and even more cheesecake-like.
Step 10: Garnish and Serve
Top with:
- Fresh strawberries
- Graham cracker crumbs
- Mint
- White chocolate shavings
Serve cold.
Enjoy every creamy spoonful.
Expert Cooking Tips & Mistakes to Avoid
Use Softened Cream Cheese
Cold cream cheese creates stubborn lumps.
Room-temperature cream cheese blends effortlessly.
Don’t Overmix After Adding Whipped Topping
Too much stirring deflates the fluff.
Fold gently for maximum volume.
Choose Thick Greek Yogurt
Thin yogurt creates a runny dessert.
Always use strained Greek yogurt for the richest texture.
Taste Before Chilling
Protein powders vary in sweetness.
Adjust the honey or sweetener before refrigerating.
Chill Long Enough
Skipping the chilling step results in a softer dessert.
Patience creates the perfect cheesecake consistency.
Variations & Customizations
Spicy Version
Looking for something unique?
Add:
- Pinch of cayenne pepper
- Dash of chili powder
- Tajín seasoning on top
The sweet-and-spicy combination is surprisingly addictive.
Healthy Version
For an even lighter dessert:
- Use fat-free Greek yogurt
- Use light cream cheese
- Sweeten with monk fruit
- Skip the graham cracker layer
This cuts calories while maintaining amazing flavor.
Kids-Friendly Version
Children love colorful desserts.
Try adding:
- Mini rainbow sprinkles
- Banana slices
- Mini chocolate chips
- Crushed vanilla wafers
Serve in fun clear cups with tiny spoons.
Storage & Reheating Instructions
Refrigerator
Store covered for 3–4 days.
The flavor actually improves after the first day.
Freezer
Freeze individual cups for up to 2 months.
Wrap tightly to prevent freezer burn.
Thawing
Transfer to the refrigerator overnight.
Avoid microwaving.
The dessert is meant to be enjoyed chilled.
Serving Suggestions
These protein fluff cups pair beautifully with:
- Fresh blueberries
- Mixed berries
- Hot coffee
- Green tea
- Iced matcha latte
- Protein smoothies
- Granola
- Sugar-free chocolate drizzle
- Toasted almonds
- Fresh mint
For brunch, arrange them on a platter with fresh fruit and yogurt parfaits.
For parties, serve them in mini dessert glasses for an elegant presentation.
Frequently Asked Questions
1. Can I make these ahead of time?
Absolutely.
They’re actually better after chilling overnight, making them ideal for meal prep.
2. Which protein powder works best?
Vanilla whey protein produces the creamiest texture.
Casein protein also works well for an even thicker dessert.
Plant-based protein can be used but may produce a slightly denser consistency.
3. Can I use frozen strawberries?
Yes.
Thaw them completely and drain excess liquid before folding them into the mixture.
4. Is this recipe good for weight loss?
Yes.
Because it’s high in protein and relatively low in calories, it can help keep you full longer while satisfying sweet cravings.
5. Can I make it dairy-free?
Definitely.
Use dairy-free cream cheese, dairy-free yogurt, and whipped coconut cream.
6. Can I turn this into a full cheesecake?
Yes.
Spread the filling into a prepared crust and refrigerate for several hours until firm.
7. Why isn’t my fluff thick enough?
The most common reasons are:
- Thin yogurt
- Warm ingredients
- Not chilling long enough
- Too much liquid
Adding a little extra protein powder can help thicken the mixture.
Final Thoughts
Desserts don’t have to be loaded with sugar or require hours in the kitchen to feel truly indulgent. These Strawberry Cheesecake Protein Fluff Cups prove that healthy eating can be every bit as satisfying as your favorite bakery treat. They’re creamy, refreshing, bursting with juicy strawberry flavor, and packed with protein to keep you feeling energized long after the last bite.
Whether you’re preparing them for a family gathering, meal-prepping snacks for the week, serving a light summer dessert, or simply treating yourself after a workout, these fluffy cheesecake cups deliver comfort and nutrition in every spoonful.
So grab your mixing bowl, whip up a batch, and discover just how delicious healthy desserts can be. If you give this recipe a try, leave a comment with your favorite topping or creative twist, rate the recipe, and share it with friends and family on social media. Your next favorite guilt-free dessert is just one fluffy bite away!