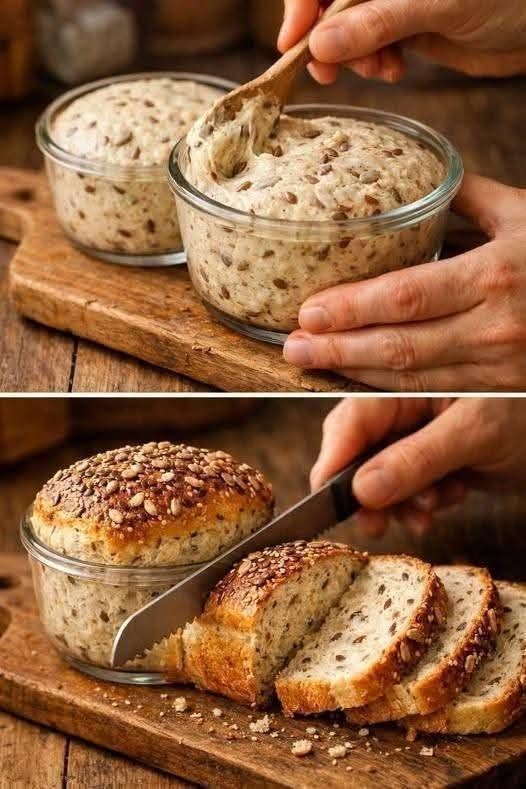
The Ultimate Guide to Easy Three Ingredient Simple Seeded Bread
Nothing beats the incredible aroma of fresh bread baking inside your kitchen on a quiet weekend morning. Many people avoid baking their own bread because they believe the entire process is far too difficult and time consuming. They think you need to spend hours aggressively kneading sticky dough on a messy counter, waiting for finicky yeast to rise in a warm spot, or buying expensive specialized kitchen machinery. The wonderful truth is that you can bake a rustic, hearty, and beautifully textured loaf using only three basic ingredients that are likely sitting in your kitchen cupboard right now. This comprehensive guide will walk you through a foolproof method to create a premium quality seed loaf with minimal effort.
This specific kitchen recipe relies on a clever chemical reaction between self raising flour and a thick yogurt base to create a beautiful rise without traditional yeast. Traditional bread baking requires living yeast cells to consume sugars and produce gas over several hours of resting time. By using self raising flour, the essential leaveners are already perfectly measured and mixed into the flour grains. When you combine this with the natural moisture of Greek yogurt, you get a quick forming dough that bakes into a beautifully tender crumb filled with rich nutrition. You achieve a spectacular crusty loaf without any complex culinary knowledge or heavy physical labor.
Once you master this incredibly basic three ingredient baking method, your breakfast and sandwich options become absolutely endless. You can slice this loaf thick to toast and slather with creamy butter, use it as a hearty base for fresh avocado toast, or pair it with warm winter soups. Making your own bread at home lets you take complete control over your food supply while avoiding chemical dough conditioners and factory preservatives. It is a deeply satisfying and simple cooking project that fills your home with warmth and brings immediate smiles to everyone around your dining table.
Preparation Time and Serving Details
To help you organize your baking schedule and prepare your kitchen counter space efficiently, here is a clear overview of the time requirements and total yield for this simple loaf.
-
Preparation time: Ten minutes
-
Baking time required: Forty minutes
-
Total wait time: Fifty minutes
-
Total servings: Ten slices
-
Total yield: One full eight inch bread loaf
Simple Ingredients for Your Seeded Bread
You do not need an extensive grocery shopping list to create this beautiful loaf. These three everyday ingredients combine to create a deeply flavorful and structurally perfect bread.
-
Three cups of self raising flour: This specialized flour contains the perfect built in ratio of baking powder and fine salt to ensure your loaf rises beautifully without yeast.
-
Two cups of plain Greek yogurt: Choose a full fat or two percent fat variety because the natural fats keep the inner crumb exceptionally moist and tender.
-
One cup of mixed raw seeds: A healthy combination of sunflower seeds, pumpkin seeds, chia seeds, and sesame seeds adds a wonderful crunch and earthy flavor.
How to Make Seeded Bread Step by Step
Follow these direct and simple instructions to achieve a beautiful homemade loaf that features a crunchy outer crust and a soft, seed filled center.
Important Kitchen Notes for Absolute Success
How to Measure Flour Correctly
The biggest reason homemade bread can turn out dense or dry is adding too much flour. Never scoop your measuring cup directly into the flour bag because this packs the flour down tight. Instead, use a large spoon to fluff the flour, fluff it into your measuring cup, and level it off flat with the back of a knife.
Choosing the Right Yogurt Type
Traditional thin yogurt contains too much liquid water and will make your dough far too sticky to handle. Always opt for thick Greek yogurt because its strained nature provides the exact ratio of moisture and protein needed to structure this specific quick bread. Unsweetened and unflavored varieties are absolute necessities.
Customizing Your Seed Blends
You can mix and match whatever seeds you enjoy most or happen to have available in your kitchen pantry. Flaxseeds, poppy seeds, hemp hearts, and black sesame seeds all work beautifully. For an extra boost of rich flavor, you can toast your seed blend lightly in a dry skillet for two minutes before adding them to the flour.
Mastering the Cooling Process
It is incredibly tempting to slice into a steaming hot loaf of bread the second it leaves the hot oven, but patience is vital here. As the bread cools on a wire rack, the internal steam finishes settling into a soft structure. Slicing too early will trap that hot moisture and can cause the interior of your slices to feel gummy or wet.
Adjusting for Sticky Dough
Depending on the brand of Greek yogurt you use, your dough might sometimes feel a bit too wet or sticky to manage comfortably. If this happens, do not panic. Simply sprinkle one extra tablespoon of flour over the dough mixture until it handles easily without clinging to your skin.
Using the Right Bakeware
Metal loaf pans are spectacular for conducting heat quickly and creating a lovely dark undercrust. If you only own a glass baking dish, you should increase your overall baking time by roughly five minutes because glass takes a bit longer to heat up fully in an oven environment.
Frequently Asked Questions
Can I use regular all purpose flour instead of self raising flour?
You can create your own alternative if you do not have self raising flour. Simply add three teaspoons of fresh baking powder and one teaspoon of fine salt to three cups of standard all purpose flour. Whisk these dry ingredients together thoroughly before adding your yogurt and seeds.
How should I store this homemade loaf to keep it fresh?
Because this natural bread does not contain any chemical preservatives, it is best enjoyed within three days. Store the cooled loaf in a clean paper bag or a wooden bread box on your kitchen counter. Avoid storing it inside the refrigerator because the cold air actually speeds up the staling process.
Can I freeze this seeded bread for later use?
Yes, this bread freezes beautifully. Slice the entire loaf completely first, then place small pieces of parchment paper between the individual slices. Wrap the whole bundle tightly in plastic wrap and store it inside a freezer safe zip top bag for up to three months. You can pop a frozen slice directly into your toaster whenever you need it.
Why did my bread turn out too dense in the middle?
This typically happens if your baking powder inside the self raising flour has expired and lost its lifting strength. Another common cause is using a yogurt that is too thin, which creates a heavy and wet environment that prevents the center from cooking through completely.
Can I add extra flavors like cheese or herbs?
Absolutely. This base recipe handles extra savory mix ins beautifully. You can fold in a half cup of shredded cheddar cheese, a tablespoon of dried rosemary, or a teaspoon of garlic powder along with your seeds to create a wonderful custom flavor profile.
Is this recipe suitable for vegan diets?
To make this bread entirely vegan, you can replace the dairy Greek yogurt with an equal amount of a thick, unsweetened plant based yogurt alternative. Coconut milk yogurt or soy based Greek style yogurts work best as long as they are thick and entirely free of vanilla flavorings.
Do I need a standalone mixer to blend this dough?
No, a machine is absolutely not required. In fact, using an electric mixer can overwork the flour gluten and make your bread tough. A simple wooden spoon or your bare hands are the absolute best tools for mixing this quick loaf.
Why did the seeds fall off the crust after baking?
Seeds can slide off if the surface of the dough is too dry when you sprinkle them on. To prevent this, lightly mist the top of your shaped loaf with a tiny bit of water or use a pastry brush to apply a thin layer of extra yogurt before pressing the seeds down.
Detailed Nutrition Information
The following tables provide the estimated nutritional values for this simple homemade seeded bread recipe. These numbers can change slightly depending on the specific dairy brands and seed selections you use.
Recipe Totals and Per Serving Breakdown
| Nutritional Component | Amount Per Single Serving | Total Amount For Full Recipe |
| Total Calories | One hundred and ninety calories | One thousand nine hundred calories |
| Total Fat Content | Six grams | Sixty grams |
| Saturated Fat | One gram | Ten grams |
| Blended Cholesterol | Five milligrams | Fifty milligrams |
| Sodium Content | Two hundred and eighty milligrams | Two thousand eight hundred milligrams |
| Total Carbohydrates | Twenty June grams | Two hundred and sixty grams |
| Dietary Fiber | Three grams | Thirty grams |
| Protein Content | Eight grams | Eighty grams |
Vitamin and Mineral Content
| Nutrient Type | Relative Percentage Value Per Serving |
| Calcium | Twelve percent of your daily needs |
| Iron | Ten percent of your daily needs |
| Vitamin D | Two percent of your daily needs |
| Potassium | Four percent of your daily needs |
Important Food Safety and Health Disclaimer
This nutritious homemade seeded bread should always be enjoyed in moderation as part of a balanced and varied diet. While the rich seed blend provides excellent healthy fats, plant proteins, and dietary fiber, individuals tracking their total daily carbohydrate intake or managing specific caloric goals should practice healthy portion control.
This specific recipe contains major food allergens including wheat gluten and sesame seeds, and it relies heavily on dairy products from milk. If you are baking this loaf for friends, school lunches, or family gatherings, always double check that your guests do not suffer from celiac disease, wheat sensitivities, sesame allergies, or severe dairy intolerance. Always practice excellent kitchen hygiene by thoroughly cleaning your mixing bowls, washing your hands before touching the dough, and storing any leftovers in a clean dry space.